21 October 2020
0 Comment

Registering Hosts and Deploying the Agent
6.2.2 Audit Vault Agent Requirements
Audit Vault Agent
[root@sp000dba03 ~]# rpm -qa|grep -i ssl
openssl-libs-1.0.2k-19.0.1.el7.x86_64
openssl-1.0.2k-19.0.1.el7.x86_64
Table 2-10 JRE Support Matrix
| JRE Version | Release/Version |
| 1.8 | 1.8.0_45 and later |
| 11 | 11.0.3 Starting Oracle Audit Vault and Database Firewall release 12.2.0.11.0. |
Note:
[root@sp000dba03 ~]# java -version
java version “1.8.0_231”
Java(TM) SE Runtime Environment (build 1.8.0_231-b11)
Java HotSpot(TM) 64-Bit Server VM (build 25.231-b11, mixed mode)
Vault Agent
6.2.3 Steps Required to Deploy and Activate the Audit Vault Agent
Deploying and activating the Audit Vault Agent on a host machine consists of these
steps:
1. Registering the Host
2. Deploying the Audit Vault Agent on the Host Computer.
3. Activating and Starting the Audit Vault Agent.
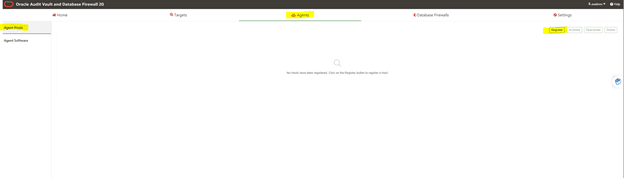
6.2.4 Registering the Host
1. Log in to the Audit Vault Server console as an administrator.
2. Click the Agents tab.
3. In the left navigation menu, click Agent Hosts.
A list of registered hosts is displayed on the page.
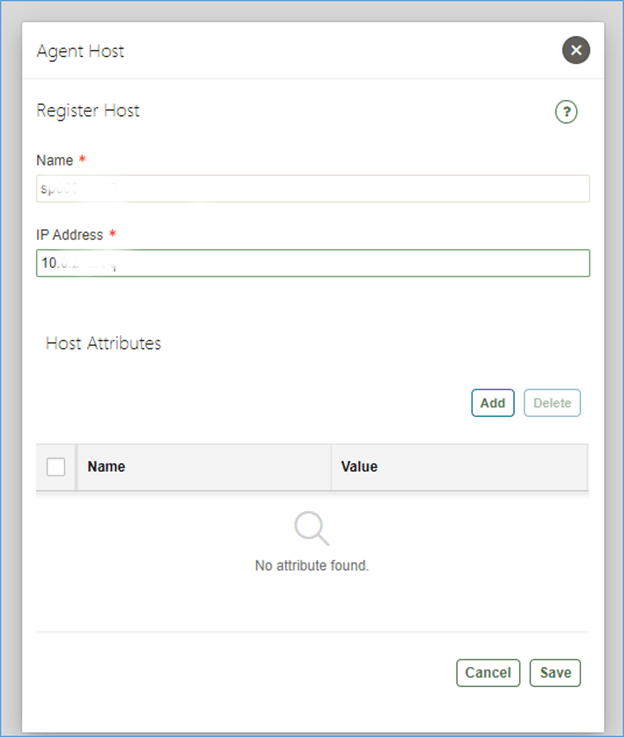
4. Click Register.
5. In Name field, enter the host name. This field is mandatory and must not contain
special characters. The system connects to the host using the IP address. Host
name is the logical name of the host and used for descriptive identification for the
user.
6. In IP Address, enter the host IP address, which is mandatory.
7. Click Save.
An Agent Activation Key is automatically generated when you register the host.

6.2.5 Deploying the Audit Vault Agent on the Host Computer
Ensure that the host machine has OpenSSL 1.0.1 (or later) installed for Audit
Vault Agent.
requires Java version 1.8 to be installed on the host computer
copy and deploy the Audit Vault Agent to the host machine:
1. Log in to the Audit Vault Server console as an administrator.
2. Click the Agents tab.
3. In the left navigation menu, click Agent Software.
A list of downloadable agent software files are displayed on the page.
4. Click the Download button next to the agent file, and then save the agent.jar file
to a location of your choice.
The download process copies the agent.jar file from the Audit Vault Server.
Ensure that you always use this agent.jar file when you deploy the agent.

[root@sp000dba03 ~]# cd /u01
[root@sp000dba03 u01]# mkdir AuditVaultAgent
[root@sp000dba03 u01]# chown orabigdba:oinstall AuditVaultAgent/
5. Using an OS user account, copy the agent.jar file to the target’s host computer.
Best Practice:
Do not install the Audit Vault Agent as root user.
[root@sp000dba03 u01]# cd AuditVaultAgent/
[root@sp000dba03 AuditVaultAgent]# ls -ltr
total 34844
-rw-r–r– 1 root root 35677173 Oct 16 15:17 agent.jar
[root@sp000dba03 AuditVaultAgent]# chown orabigdba:oinstall agent.jar
6. On the host machine, set the JAVA_HOME environment variable to the installation
directory of the Jdk, and make sure that the Java executable corresponds to this
JAVA_HOME setting.
[orabigdba@sp000dba03 AuditVaultAgent]$ which java
/bin/java
[orabigdba@sp000dba03 AuditVaultAgent]$
[orabigdba@sp000dba03 AuditVaultAgent]$
[orabigdba@sp000dba03 AuditVaultAgent]$
[orabigdba@sp000dba03 AuditVaultAgent]$ ls -ltr /bin/java
lrwxrwxrwx 1 root root 22 Jan 18 2020 /bin/java -> /etc/alternatives/java
[orabigdba@sp000dba03 AuditVaultAgent]$ ls -ltr /etc/alternatives/java
lrwxrwxrwx 1 root root 41 Jan 18 2020 /etc/alternatives/java -> /usr/java/jdk1.8.0_231-amd64/jre/bin/java
[orabigdba@sp000dba03 AuditVaultAgent]$
export JAVA_HOME=/usr/java/jdk1.8.0_231-amd64/jre
export PATH=/usr/java/jdk1.8.0_231-amd64/jre/bin:$PATH
[orabigdba@sp000dba03 AuditVaultAgent]$ which java
/usr/java/jdk1.8.0_231-amd64/jre/bin/java
[orabigdba@sp000dba03 AuditVaultAgent]$ java -version
java version “1.8.0_231”
Java(TM) SE Runtime Environment (build 1.8.0_231-b11)
Java HotSpot(TM) 64-Bit Server VM (build 25.231-b11, mixed mode)
7. chmod 777 agent.jar
8. In the directory where you placed the agent.jar file, extract it by running:
java -jar agent.jar -d Agent_Home
This creates a directory by the name you enter for Agent_Home, and installs the
Audit Vault Agent in that directory.
[orabigdba@sp000dba03 AuditVaultAgent]$ chmod 777 agent.jar
[orabigdba@sp000dba03 AuditVaultAgent]$
[orabigdba@sp000dba03 AuditVaultAgent]$
[orabigdba@sp000dba03 AuditVaultAgent]$ java -jar agent.jar -d /u01/AuditVaultAgent
Checking for updates…
Agent is updating. This operation may take a few minutes. Please wait…
Agent updated successfully.
Agent installed successfully.
If deploying hostmonitor please refer to product documentation for additional installation steps.
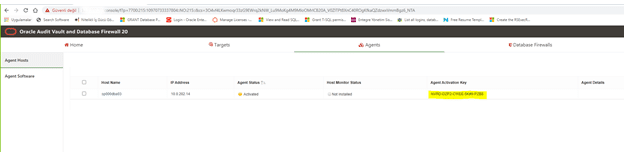
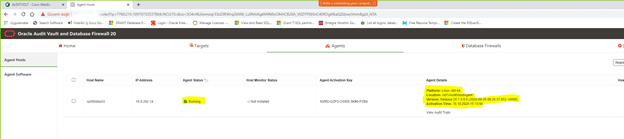
6.2.6 Activating and Starting the Audit Vault Agent
1. Click the Hosts tab.
2. Click the Agents tab.
3. In the left navigation menu, click Agent Hosts.
A list of registered hosts are displayed on the page.
4. On this page, make a note of the Agent Activation Key for this host.
5. On the host machine, change directory as follows:
cd Agent_Home/bin
Agent_Home is the directory created in the step 8 above.
export JAVA_HOME=/usr/java/jdk1.8.0_231-amd64/jre
export PATH=/usr/java/jdk1.8.0_231-amd64/jre/bin:$PATH
6. Run one of the following commands and provide the Agent Activation Key:
agentctl start -k
Enter Activation Key:
Enter the activation key when prompted. This key will not be displayed as you type
it.
Note: the -k argument is not needed after the initial agentctl start command.
orabigdba@sp000dba03 AuditVaultAgent]$ cd bin
[orabigdba@sp000dba03 bin]$ ./agentctl start -k
Enter Activation Key:
Agent started successfully.
7
Configuring Targets, Audit Trails, and
Database Firewall Monitoring Points
C.3.2 Oracle Database Setup Scripts
$AGENT_HOME/av/plugins/com.oracle.av.plugin.oracle/config/oracle_user_setup.sql
1. Create a user account for Oracle Audit Vault and Database Firewall on the Oracle
Database. For example:
SQL> CREATE USER username IDENTIFIED BY password
You will use this username and password when registering this Oracle Database
as a target in the Audit Vault Server.
[orabigdba@sp000dba03 bin]$ env|grep ORAC
ORACLE_UNQNAME=r12live
ORACLE_SID=r12live1
ORACLE_BASE=/u01/app/orabigdba/
ORACLE_HOME=/u01/app/orabigdba/product/euas_prod_11204_n
sqlplus / as sysdba
SQL> create user AUDITVAULT identified by “Welcome!1”;
2. Connect as user SYS with the SYSDBA privilege. For example:
SQL> CONNECT SYS / AS SYSDBA
3. To set up Oracle Audit Vault and Database Firewall user privileges, run the setup
script as follows:
SQL> @oracle_user_setup.sql username mode
• username: Enter the name of the user you created in Step 1.
• mode: Enter one of the following:
– SETUP: To set up privileges for managing the Oracle Database audit policy
from Oracle Audit Vault and Database Firewall, and for collecting data
from any audit trail type. For example, use this mode for a TABLE audit
trail in Oracle Audit Vault and Database Firewall.
– SPA: To enable stored procedure auditing for this database
– ENTITLEMENT: To enable user entitlement auditing for this database
4. If Database Vault is installed and enabled on the Oracle database, log in as a user
who has been granted the DV_OWNER role do the following:
Grant the Oracle Audit Vault and Database Firewall user the DV_SECANALYST role
on this Oracle Database. For example:
SQL> GRANT DV_SECANALYST TO username;
For username, enter the user name you created in Step 1.
[orabigdba@sp000dba03 config]$ pwd
/u01/AuditVaultAgent/av/plugins/com.oracle.av.plugin.oracle/config
[orabigdba@sp000dba03 config]$ ls -ltr
total 68
-rw-r—– 1 orabigdba oinstall 933 Jul 7 21:05 SyslogFileProperties.xml
-rwxr-xr-x 1 orabigdba oinstall 12110 Jul 7 21:05 oracle_user_setup.sql
-rwxr-xr-x 1 orabigdba oinstall 7243 Jul 7 21:05 oracle_drop_db_permissions.sql
-rwxr-xr-x 1 orabigdba oinstall 4124 Jul 7 21:05 oracle_AVDF_E1_user_setup.sql
-rwxr-xr-x 1 orabigdba oinstall 4555 Jul 7 21:05 oracle_AVDF_E1_drop_db_permissions.sql
-rwxr-xr-x 1 orabigdba oinstall 8722 Jul 7 21:05 oracle_AVDF_dbcs_user_setup.sql
-rwxr-xr-x 1 orabigdba oinstall 8677 Jul 7 21:05 oracle_AVDF_dbcs_drop_db_permissions.sql
-rw-r—– 1 orabigdba oinstall 1076 Jul 7 21:05 DirectoryTrailProperties.xml
[orabigdba@sp000dba03 config]$ sqlplus / as sysdba
SQL*Plus: Release 11.2.0.4.0 Production on Fri Oct 16 15:36:50 2020
Copyright (c) 1982, 2013, Oracle. All rights reserved.
Connected to:
Oracle Database 11g Enterprise Edition Release 11.2.0.4.0 – 64bit Production
With the Partitioning, Real Application Clusters, Automatic Storage Management, OLAP,
Data Mining and Real Application Testing options
SQL> @oracle_user_setup.sql AUDITVAULT SETUP
SQL> @oracle_user_setup.sql AUDITVAULT SETUP
Session altered.
Granting privileges to “AUDITVAULT” … Done.
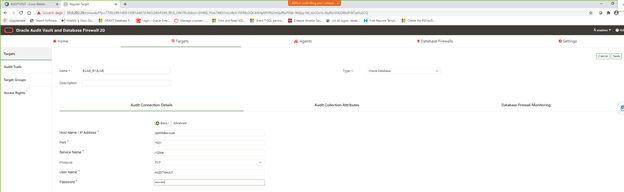
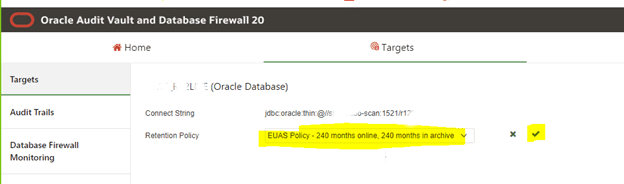
7.2.1.2 Registering Targets
1. Log in to the Audit Vault Server console as an administrator.
2. Click the Targets tab.
The Targets tab in the left navigation is selected by default. The main page
contains a list of configured targets. You can sort or filter the list of targets.
3. Click Register in the top right corner.
[orabigdba@sp000dba03 ~]$ srvctl config scan
SCAN name: sp000dbo-scan, Network: 1/10.0.202.0/255.255.255.0/bondeth0
SCAN VIP name: scan1, IP: /sp000dbo-scan/10.0.202.26
SCAN VIP name: scan2, IP: /sp000dbo-scan/10.0.202.27
SCAN VIP name: scan3, IP: /sp000dbo-scan/10.0.202.28
[orabigdba@sp000dba03 ~]$ srvctl config scan_listener
SCAN Listener LISTENER_SCAN1 exists. Port: TCP:1521
SCAN Listener LISTENER_SCAN2 exists. Port: TCP:1521
SCAN Listener LISTENER_SCAN3 exists. Port: TCP:1521
[orabigdba@sp000dba03 ~]$ lsnrctl services
.
.
Service “r12live” has 1 instance(s).
Instance “r12live1”, status READY, has 1 handler(s) for this service…
Handler(s):
“DEDICATED” established:393317 refused:0 state:ready
LOCAL SERVER


Host Name / IP Address: RAC icin Scan Hostname girilebilir
Audit Collection Attributes tab:
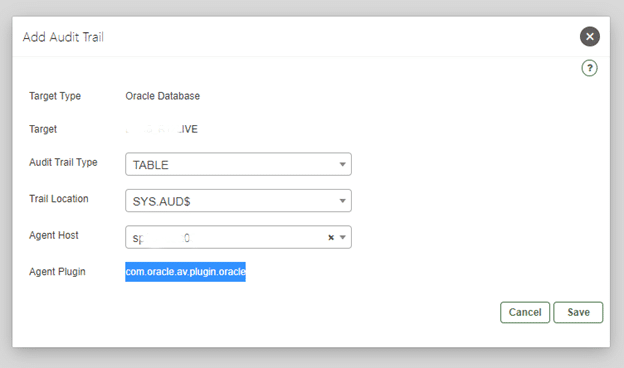
7.4.2 Adding Audit Trails in Audit Vault Server
To configure an audit trail for a target:
1. Create a new target.
2. Click the Targets tab. The Targets tab in the left navigation menu is selected by
default.
3. Click on the name of the target for which the audit trail needs to be added.

4. Under Audit Data Collection, select Add.

The Add Audit Trail dialog appears.
5. Select the value in the Audit Trail Type menu based on the target.
Note:
For complete details on the audit trail types, see Plug-ins That are
Shipped with Oracle Audit Vault and Database Firewall.
There are different audit trail types available in the drop down list. Select one of
the following:
• CUSTOM
• DIRECTORY
• EVENT LOG
• NETWORK
• SYSLOG
This trail type can collect from either syslog or rsyslog files. If both are
present, you must give the exact Trail Location in the following step ahead, if
you want to collect audit data from rsyslog files. See Table C-26 for details.
Note:
Ensure that records generated by rsyslog have the same time zone
information as the Audit Vault Agent running on the collection host.
• TABLE
• TRANSACTION LOG
See Table C-20 for details on which types of audit trails can be collected for a
specific target type.
6. In the Trail Location field, enter the location of the audit trail on the target
computer. The trail location depends on the type of target.
For example, unified_audit_trail.
For complete details on the target type and trail location, see Plug-ins That are
Shipped with Oracle Audit Vault and Database Firewall.
Note:
If you select DIRECTORY or TRANSACTION LOG as Audit Trail Type, then
the trail location must be a directory mask. See Table C-26 for important
details.
7. In the Agent Host field, select the host computer where the Audit Vault Agent is
deployed.
8. The Agent Plug-in field automatically contains the appropriate plug-in name.
9. Click Save.
The audit trail is added to the list on the Audit Trails tab. The collection status
displays a red down-arrow initially. This indicates the status of the trail as stopped.
The audit trail starts automatically shortly after it is added.
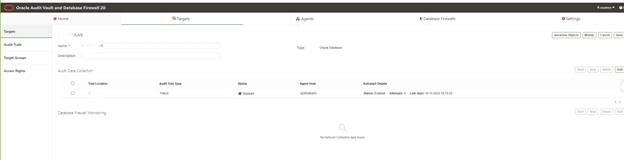
7.4.4 Checking the Status of Audit Trails in the Audit Vault Server
Learn about checking the status of audit trails in Oracle Audit Vault Server.
To check the status of audit trails:
1. Log in to the Audit Vault Server console as an administrator.
2. Click the Targets tab. The Targets tab in the left navigation menu is selected by
default.
3. Click Audit Trails tab in the left navigation menu.
It lists targets that have audit trails configured. Check the Collection Status
column. The status can be one of the following:
• Idle – Trail is up and running, no new audit data to collect. In this state, the trail
is waiting for the target to generate new audit data.
• Starting – Collection process is starting.
• Collecting – Trail is currently actively collecting audit data.
• Stopping – Collection process is stopping.
• Stopped – Trail is currently stopped.
• Recovering – Trail has collected a batch of audit data and is setting a
checkpoint on the Audit Vault Server. This can take a while depending on
the server load.
• Unreachable – A heartbeat timeout has occurred, indicating that a heartbeat
message has not been received from the trail in the last two minutes. This
status is temporary unless the trail has crashed.
• Archive data files are required (link) – If you see this link, it means a new
audit trail contains expired audit records that must be archived, and that the
required archive data files are not available.
The Trail Autostart Details column indicates whether autostart is enabled for
a trail, and whether there have been attempts to restart a failed audit trail (for
example, if a target goes down temporarily).
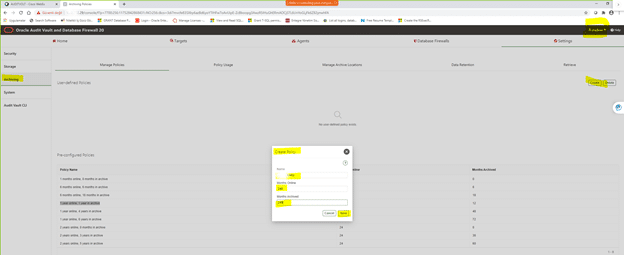
C.4.1.2 Scheduling Automated Purge Jobs
** Trail durdurulur: Stop Trail
— AV Server console una AVADMIN olarak login olunur.
— Secured Targets/Monitoring/Audit Trail safasindan, istenen Host a ait Audit Trail secilir ve STOP edilir.
** Agent durdurulur: Stop Agent
— export JAVA_HOME=/oracle/auditVaultAgent/java7/jre
— export PATH=/oracle/auditVaultAgent/java7/jre/bin:$PATH
— which java
— java -version
— cd /oracle/auditVaultAgent/bin
— ./agentctl stop
To schedule an automated purge job for an Oracle Database target:
1. Log in to SQL*Plus on the target database as a user who has been granted the
EXECUTE privilege for the DBMS_AUDIT_MGMT PL/SQL package.
For example:
sqlplus tjones
Enter password: password
2. Initialize the audit trail cleanup operation.
In the following example, the DEFAULT_CLEANUP_INTERVAL setting runs the job
every two hours:
BEGIN
DBMS_AUDIT_MGMT.INIT_CLEANUP(
AUDIT_TRAIL_TYPE => DBMS_AUDIT_MGMT.AUDIT_TRAIL_ALL,
DEFAULT_CLEANUP_INTERVAL => 2 );
END;
/
Note:
• In case you are collecting audit data from CDB, then execute this
step every time there is any change in the PDB instance.
• In case you are using a CDB unified audit trail, then use
CONTAINER_ALL parameter in the above command.
3. Verify that the audit trail is initialized for cleanup.
For example:
SET SERVEROUTPUT ON
BEGIN
IF
DBMS_AUDIT_MGMT.IS_CLEANUP_INITIALIZED(DBMS_AUDIT_MGMT.AUDIT_TRAIL_ALL)
THEN
DBMS_OUTPUT.PUT_LINE(‘Database and OS audit are initialized for cleanup’);
ELSE
DBMS_OUTPUT.PUT_LINE(‘Database and OS audit are not initialized for
cleanup.’);
END IF;
END;
/
4. Use the DBMS_AUDIT_MGMT.CREATE_PURGE_JOB procedure to create and schedule
the purge job.
In this procedure, ensure that you set the USE_LAST_ARCH_TIMESTAMP property to
TRUE, so all records older than the timestamp can be deleted.
The following procedure creates a purge job called
CLEANUP_OS_DB_AUDIT_RECORDS that will run every two hours to purge the audit
records.
BEGIN
DBMS_AUDIT_MGMT.CREATE_PURGE_JOB (
AUDIT_TRAIL_TYPE => DBMS_AUDIT_MGMT.AUDIT_TRAIL_ALL,
AUDIT_TRAIL_PURGE_INTERVAL => 2,
AUDIT_TRAIL_PURGE_NAME => ‘CLEANUP_OS_DB_AUDIT_RECORDS’,
USE_LAST_ARCH_TIMESTAMP => TRUE );
END;
/
———————————-
— Varolan purge job lari:
———————————-
select * from DBA_AUDIT_MGMT_CLEANUP_JOBS;
no rows selected
——————————————————
— Hangi tarihten itibaren AUD$ in silinebilecegi
——————————————————
select * from DBA_AUDIT_MGMT_LAST_ARCH_TS;
=> LAST_ARCH_TS degeri, agent aud$’i okumayi bitirdiginde otomatik olarak guncellenir
—————————————–
— Daha once yapilmis silmeler
—————————————–
select * from DBA_AUDIT_MGMT_CLEAN_EVENTS;
—————————————–
— Current Audit Parameter settings:
—————————————–
column parameter_name format a30
column parameter_value format a20
column audit_trail format a20
select * from dba_audit_mgmt_config_params;
—————————————–
— Re-schedule Purge Job:
—————————————–
SELECT OWNER,JOB_NAME, START_DATE,NEXT_RUN_DATE,REPEAT_INTERVAL FROM DBA_SCHEDULER_JOBS
WHERE JOB_NAME = ‘PURGE_DBA_AUDIT’;
OWNER JOB_NAME
—————————— ——————————
START_DATE
—————————————————————————
NEXT_RUN_DATE
—————————————————————————
REPEAT_INTERVAL
——————————————————————————–
SYS PURGE_DBA_AUDIT
29-DEC-14 03.54.59.028211 PM +02:00
29-DEC-14 03.54.59.000000 PM +02:00
FREQ=HOURLY;INTERVAL=168
begin
DBMS_SCHEDULER.SET_ATTRIBUTE (
name => ‘PURGE_DBA_AUDIT’,
attribute => ‘START_DATE’,
value => to_timestamp_tz(’03-JAN-2015 11:30:00 PM +00:00′));
end;
/
SELECT OWNER,JOB_NAME, START_DATE,NEXT_RUN_DATE,REPEAT_INTERVAL FROM DBA_SCHEDULER_JOBS
WHERE JOB_NAME = ‘PURGE_DBA_AUDIT’;
OWNER JOB_NAME
—————————— ——————————
START_DATE
—————————————————————————
NEXT_RUN_DATE
—————————————————————————
REPEAT_INTERVAL
——————————————————————————–
SYS PURGE_DBA_AUDIT
03-JAN-15 11.30.00.000000 PM +00:00
03-JAN-15 11.30.00.000000 PM +00:00
FREQ=HOURLY;INTERVAL=168
—————————————–
— Disable Purge Job:
—————————————–
begin
dbms_audit_mgmt.set_purge_job_status(
audit_trail_purge_name => ‘PURGE_DBA_AUDIT’,
audit_trail_status_value => DBMS_AUDIT_MGMT.PURGE_JOB_DISABLE);
end;
/
—————————————–
— Enable Purge Job:
—————————————–
begin
dbms_audit_mgmt.set_purge_job_status(
audit_trail_purge_name => ‘PURGE_DBA_AUDIT’,
audit_trail_status_value => DBMS_AUDIT_MGMT.PURGE_JOB_ENABLE);
end;
/
—————————————–
— Change Interval of Purge job:
—————————————–
begin
dbms_audit_mgmt.set_purge_job_interval(
audit_trail_purge_name => ‘PURGE_DBA_AUDIT’,
audit_trail_interval_value => 24);
end;
/
—————————————–
— Remove Purge Job:
—————————————–
begin
dbms_audit_mgmt.drop_purge_job(
audit_trail_purge_name => ‘PURGE_DBA_AUDIT’);
end;
/
——————————————————————————————————————————————————————–
— Audit Trail de belirli bir gunluk veriyi tutmak icin, “dbms_audit_mgmt.set_last_archive_timestamp” i her gun (or) 7 gun onceye update eden bir job ile,
— “en son arsivlenme tarihi” ilerletilerek, 7 gunluk bir window olusturulabilir:
——————————————————————————————————————————————————————–
begin
dbms_scheduler.create_job(
job_name => ‘UPDATE_AUD_LAST_ARCH_TIME’,
job_type => ‘PLSQL_BLOCK’,
job_action => ‘begin
dbms_audit_mgmt.set_last_archive_timestamp(dbms_audit_mgmt.audit_trail_aud_std,trunc(systimestamp)-7);’
dbms_audit_mgmt.set_last_archive_timestamp(dbms_audit_mgmt.audit_trail_fga_std,trunc(systimestamp)-7);’
dbms_audit_mgmt.set_last_archive_timestamp(dbms_audit_mgmt.audit_trail_os,trunc(systimestamp)-7);’
dbms_audit_mgmt.set_last_archive_timestamp(dbms_audit_mgmt.audit_trail_mxl,trunc(systimestamp)-7);’
end;
‘,
start_date => systimestamp,
repeat_interval => ‘freq=daily; byhour=0; byminute=0; bysecond=0;’,
end_date => null,
enabled => true,
comments => ‘Tum Audit Trail tipleri icin, last archive time i, son 7 gun kalacak sekilde gunceller…’);
end;
/
—————————————————-
— Purge Islemlerinin Son Durumu ():
—————————————————-
select * from DBA_AUDIT_MGMT_CLEAN_EVENTS
AUDIT_TRAIL RAC_INSTANCE CLEANUP_TIME DELETE_COUNT WAS
—————————- ———— ————————————————————————— ———— —
STANDARD AUDIT TRAIL 0 06-SEP-13 06.57.57.714180 AM +00:00 18660 NO
SQL> select * from DBA_AUDIT_MGMT_CLEANUP_JOBS;
JOB_NAME JOB_STAT AUDIT_TRAIL JOB_FREQUENCY
—————————————————————————————————- ——– —————————- —————————————————————————————————-
PURGE_DBA_AUDIT ENABLED STANDARD AUDIT TRAIL FREQ=HOURLY;INTERVAL=168
SQL> select count(*) from sys.aud$;
COUNT(*)
———-
2242
SQL> select * from DBA_AUDIT_MGMT_LAST_ARCH_TS;
AUDIT_TRAIL RAC_INSTANCE LAST_ARCHIVE_TS
——————– ———— —————————————————————————
STANDARD AUDIT TRAIL 0 06-SEP-13 01.29.07.902000 PM +00:00
6.3 Stopping, Starting, and Other Agent Operations
6.3.1 Stopping and Starting Oracle Audit Vault Agent
** Stop Agent:
export JAVA_HOME=/usr/java/jdk1.8.0_231-amd64/jre
export PATH=/usr/java/jdk1.8.0_231-amd64/jre/bin:$PATH
cd /u01/AuditVaultAgent/bin
./agentctl stop
** Start Agent:
export JAVA_HOME=/usr/java/jdk1.8.0_231-amd64/jre
export PATH=/usr/java/jdk1.8.0_231-amd64/jre/bin:$PATH
cd /u01/AuditVaultAgent/bin
./agentctl start
Disable Password Expiration of AVADMIN, AVAUDITOR:
AV server da SQLPLUS ile:
select username,profile from DBA_USERS where username in (‘AVADMIN’,’AVAUDITOR’);
USERNAME PROFILE
—————————— ——————————————————————————————————————————–
AVADMIN AVS_DEFAULT
AVAUDITOR AVS_DEFAULT
RESOURCE_NAME LIMIT
——————————– ——————————————————————————————————————————–
COMPOSITE_LIMIT DEFAULT
SESSIONS_PER_USER DEFAULT
CPU_PER_SESSION DEFAULT
CPU_PER_CALL DEFAULT
LOGICAL_READS_PER_SESSION DEFAULT
LOGICAL_READS_PER_CALL DEFAULT
IDLE_TIME UNLIMITED
CONNECT_TIME UNLIMITED
PRIVATE_SGA DEFAULT
FAILED_LOGIN_ATTEMPTS 3
PASSWORD_LIFE_TIME 90
PASSWORD_REUSE_TIME 365
PASSWORD_REUSE_MAX 20
PASSWORD_VERIFY_FUNCTION AVS_INTERACTIVE_PWD_CHECK
PASSWORD_LOCK_TIME 1
PASSWORD_GRACE_TIME 3
INACTIVE_ACCOUNT_TIME DEFAULT
alter profile AVS_DEFAULT limit password_life_time UNLIMITED;
select resource_name,limit from dba_profiles where profile=’DEFAULT’;
RESOURCE_NAME LIMIT
——————————– —————————————-
COMPOSITE_LIMIT UNLIMITED
SESSIONS_PER_USER UNLIMITED
CPU_PER_SESSION UNLIMITED
CPU_PER_CALL UNLIMITED
LOGICAL_READS_PER_SESSION UNLIMITED
LOGICAL_READS_PER_CALL UNLIMITED
IDLE_TIME UNLIMITED
CONNECT_TIME UNLIMITED
PRIVATE_SGA UNLIMITED
FAILED_LOGIN_ATTEMPTS 10
PASSWORD_LIFE_TIME UNLIMITED è
PASSWORD_REUSE_TIME UNLIMITED
PASSWORD_REUSE_MAX UNLIMITED
PASSWORD_VERIFY_FUNCTION NULL
PASSWORD_LOCK_TIME 1
PASSWORD_GRACE_TIME 7
AGENT START CRON JOB
— /u01/AuditVaultAgent/start_av_agent.sh
#!/bin/bash
cd /home/orabigdba
. ./.profile.r12live
export JAVA_HOME=/usr/java/jdk1.8.0_231-amd64/jre
export PATH=/usr/java/jdk1.8.0_231-amd64/jre/bin:$PATH
if [ $(ps -ef | grep “AuditVaultAgent” | grep -v grep | wc -l) -eq 0 ]
then
echo “Audit Vault Agent is NOT running, starting the agent…”
/u01/AuditVaultAgent/bin/agentctl start
else
echo “Audit Vault Agent IS running, exiting…”
fi
chmod +x /u01/AuditVaultAgent/start_av_agent.sh
— crontab:
### oracle.tr.ACS: check Audit Vault Agent and start when necessary:
0 * * * * /u01/AuditVaultAgent /start_av_agent.sh >/dev/null 2>/dev/null

— Agent log location:
/oracle/auditVaultAgent/av/log
— AVDF Server log location:
/var/lib/oracle/dbfw/av/log
START/STOP AUDIT VAULT SERVER GRACEFULLY (CLEAN):
To gracefully stop the AVDF machine, you need to follow the below steps:
(How to Shutdown AVDF Console and Server Database in 12.2 (Doc ID 2260021.1).)
1. /usr/local/dbfw/bin/javafwk stop
2. /usr/local/dbfw/bin/dbfwdb stop
3. /usr/local/dbfw/bin/asmdb stop
4. Stop the Listener. Lsnrctl stop
5. shutdown the OS.
For starting, use the steps backwards.
11g: Shrink Fragmented AUD$ Table:
set lines 400 pages 2000
set autotrace on explain statistics
set timing on
select count(*) from aud$;
AUD$ küçültmek için
alter table sys.aud$ enable row movement;
alter table sys.aud$ shrink space cascade;
alter table sys.aud$ disable row movement;
set lines 400 pages 2000
set autotrace on explain statistics
set timing on
select count(*) from aud$;
Some Useful Queries:
— AV Server, SQLPLUS:
conn avsys
col secured_target_name for a40
select SECURED_TARGET_NAME,count(*) from avsys.event_log group by SECURED_TARGET_NAME;
select HIGH_VALUE, NUM_ROWS from dba_tab_partitions where table_name=’EVENT_LOG’;
SELECT To_Char(NTIMESTAMP#,’YYYY-MM-DD’) DAY, count(*) COUNT from aud$ group by To_Char(NTIMESTAMP#,’YYYY-MM-DD’);
col location for a70
col error_message for a100
select location,error_message from avsys.audit_trail
col secured_target_name for a40
select /*+ PARALLEL(T,16) */ secured_target_name,To_Char(EVENT_TIME,’YYYY-MM-DD’) DAY, count(*)
from avsys.event_log T
— where EVENT_TIME > to_date(‘15.04.2015 00:00:00′,’dd.mm.yyyy hh24:mi:ss’)
group by secured_target_name,To_Char(EVENT_TIME,’YYYY-MM-DD’)
order by secured_target_name,To_Char(EVENT_TIME,’YYYY-MM-DD’);
col secured_target_name for a40
select SECURED_TARGET_NAME,count(*) from avsys.event_log group by SECURED_TARGET_NAME;
— Target DB, SQLPLUS:
SELECT /*+ PARALLEL(T,16) */ To_Char(NTIMESTAMP#,’YYYY-MM-DD’) DAY, count(*) COUNT
from aud$ T
where ntimestamp# > sysdate – 30
group by To_Char(NTIMESTAMP#,’YYYY-MM-DD’)
order by To_Char(NTIMESTAMP#,’YYYY-MM-DD’);
Source: Audit Vault and Database Firewall Administrator’s Guide

Tags: