10 January 2021
1 Comment

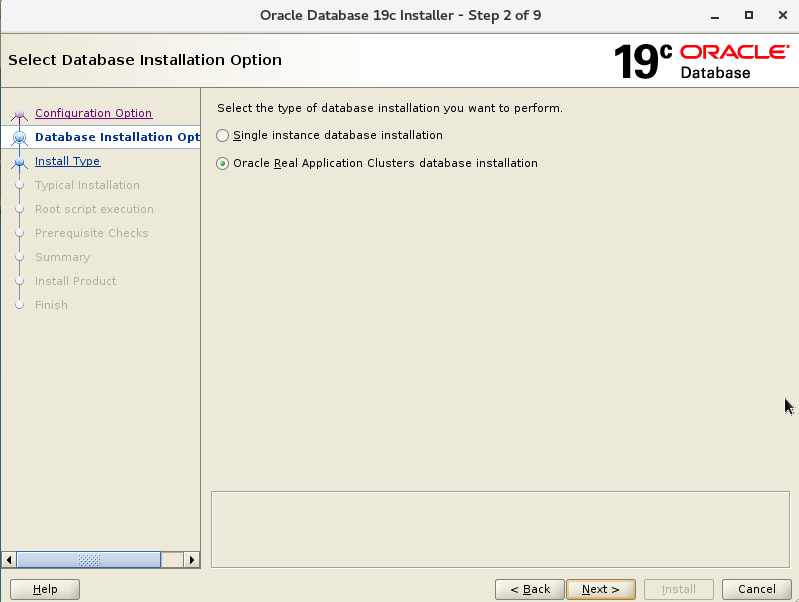
What is Oracle RAC?
Thing first RAC stands for real application cluster the main objective of real application cluster is to provide performance scalability and resilience. So provides high availability (HA) and scalability to the Oracle Database Real application cluster is one of the database options that are available to extend the functionality of Oracle database. Oracle RAC allows multiple instances running on different servers to access the same physical database stored on shared storage.
Oracle rac options is included in standard edition of Oracle database and it comes with extra cost for Enterprise Edition. So when we say an Application is talking to an Oracle database management system what do we exactly mean by Oracle database management system? You can break database management system into tow main components: Instance and database.
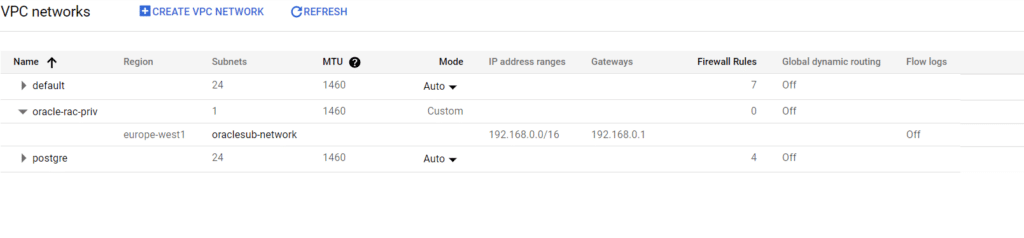
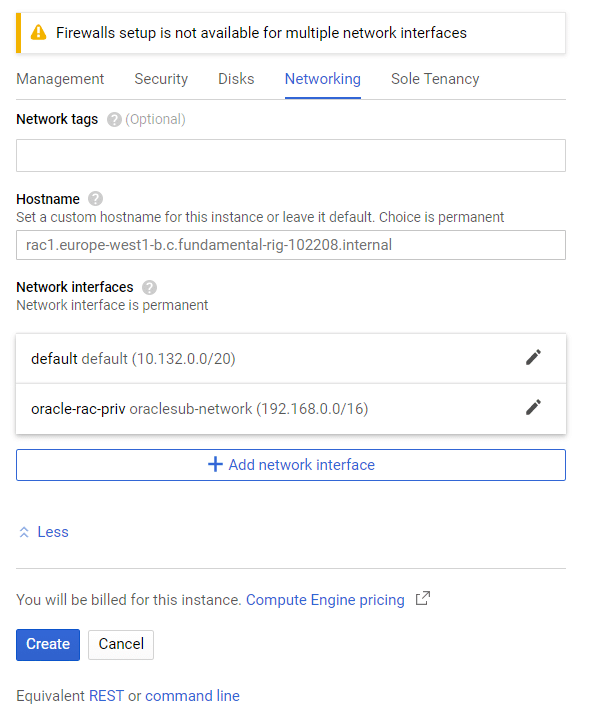
In the article below, we start our installation scenario steps of a two node of an Oracle Database 19c RAC on CentOS 7 on Google Cloud Platform.
You can Netapp add disk for oracle asm storage with different ISCSI driver. You have to adjust iscsi driver as virtual.


sudo su –
yum update
In addition to the basic OS installation, the following packages must be installed whilst logged in as the root user.
This includes the 64-bit and 32-bit versions of some packages.
[root@rac1 ~]# curl http://public-yum.oracle.com/public-yum-ol7.repo -o /etc/yum.repos.d/public-yum-ol7.repo
[root@rac1 ~]# sed -i -e “s/enabled=1/enabled=0/g” /etc/yum.repos.d/public-yum-ol7.repo
[root@rac1 ~]# rpm –import http://yum.oracle.com/RPM-GPG-KEY-oracle-ol7
[root@rac1 ~]# yum –enablerepo=ol7_latest -y install oracle-database-preinstall-19c
yum install gcc -y
yum install gcc-c++ -y
yum install glibc -y
yum install glibc.i686 -y
yum install glibc-devel -y
yum install glibc-devel.i686 -y
yum install ksh -y
yum install libgcc -y
yum install libgcc.i686 -y
yum install libstdc++ -y
yum install libstdc++.i686 -y
yum install libstdc++-devel -y
yum install libstdc++-devel.i686 -y
yum install libaio -y
yum install libaio.i686 -y
yum install libaio-devel -y
yum install libaio-devel.i686 -y
yum install libXext -y
yum install libXext.i686 -y
yum install libX11 -y
yum install libX11.i686 -y
yum install libXau -y
yum install libXau.i686 -y
yum install libxcb -y
yum install libxcb.i686 -y
yum install libXi -y
yum install libXi.i686 -y
yum install make -y
yum install sysstat -y
yum install unixODBC -y
yum install unixODBC-devel -y
yum install make-3.81-19.el6 -y
yum install nfs-utils -y
yum install sysstat-9.0.4 -y
Add or amend the following lines to the “/etc/sysctl.conf” file.
net.ipv4.ip_forward = 0
net.ipv4.conf.default.rp_filter = 1
net.ipv4.conf.default.accept_source_route = 0
kernel.sysrq = 0
kernel.core_uses_pid = 1
net.ipv4.tcp_syncookies = 1
kernel.msgmnb = 65536
kernel.msgmax = 65536
kernel.shmmax = 4398046511104
kernel.shmall = 1073741824
fs.file-max = 6815744
kernel.sem = 250 32000 100 128
kernel.shmmni = 4096
net.core.rmem_default = 262144
net.core.rmem_max = 4194304
net.core.wmem_default = 262144
net.core.wmem_max = 1048576
fs.aio-max-nr = 1048576
net.ipv4.ip_local_port_range = 9000 65500
kernel.panic_on_oops = 1
vm.swappiness = 1
vm.dirty_background_ratio = 3
vm.dirty_ratio = 80
vm.dirty_expire_centisecs = 500
vm.dirty_writeback_centisecs = 100
Run the following command to change the current kernel parameters.
/sbin/sysctl -p
Reboot
vi /etc/selinux/config and set SELINUX=disabled
[root@rac1 ~]# vi /etc/selinux/config
[root@rac1 ~]# systemctl stop firewalld.service
[root@rac1 ~]# systemctl disable firewalld.servicesystemctl stop firewalld
systemctl disable firewalldsystemctl stop avahi-daemon.service
systemctl disable avahi-daemon.service
— Make sure NTP (Chrony on OL7/RHEL7) is enabled.
systemctl stop chronyd
systemctl disable chronyd
[root@rac1 ~]# systemctl status firewalld
Removed symlink /etc/systemd/system/multi-user.target.wants/firewalld.service.
Removed symlink /etc/systemd/system/dbus-org.fedoraproject.FirewallD1.service.
[root@rac1 ~]# systemctl status firewalld
● firewalld.service – firewalld – dynamic firewall daemon
Loaded: loaded (/usr/lib/systemd/system/firewalld.service; disabled; vendor preset: enabled)
Active: inactive (dead)
Docs: man:firewalld(1)
Dec 28 23:04:49 localhost systemd[1]: Starting firewalld – dynamic firewall daemon…
Dec 28 23:04:49 localhost systemd[1]: Started firewalld – dynamic firewall daemon.
Dec 28 23:04:49 localhost firewalld[534]: WARNING: AllowZoneDrifting is enabled. This is considered an insecure configuration op…it now.
Dec 28 23:09:00 rac1 systemd[1]: Stopping firewalld – dynamic firewall daemon…
Dec 28 23:09:01 rac1 systemd[1]: Stopped firewalld – dynamic firewall daemon.
Hint: Some lines were ellipsized, use -l to show in full.
Or No Stop Chronoy
vi /etc/chrony.conf
Allow NTP client access from local network.
allow 192.168.0.0/16
allow 10.142.0.0/16
[root@rac1 ~]# systemctl restart chronyd.service
[root@rac1 ~]# systemctl enable chronyd.service
[root@rac1 ~]# systemctl status chronyd
● chronyd.service – NTP client/server
Loaded: loaded (/usr/lib/systemd/system/chronyd.service; enabled; vendor preset: enabled)
Active: active (running) since Mon 2020-12-28 23:13:19 UTC; 7s ago
Docs: man:chronyd(8)
man:chrony.conf(5)
Main PID: 11830 (chronyd)
CGroup: /system.slice/chronyd.service
└─11830 /usr/sbin/chronyd
Dec 28 23:13:19 rac1 systemd[1]: Starting NTP client/server…
Dec 28 23:13:19 rac1 chronyd[11830]: chronyd version 3.4 starting (+CMDMON +NTP +REFCLOCK +RTC +PRIVDROP +SCFILTER +SIGND +ASYN… +DEBUG)
Dec 28 23:13:19 rac1 chronyd[11830]: Frequency -59.041 +/- 0.728 ppm read from /var/lib/chrony/drift
Dec 28 23:13:19 rac1 systemd[1]: Started NTP client/server.
Dec 28 23:13:23 rac1 chronyd[11830]: Selected source 169.254.169.254
Hint: Some lines were ellipsized, use -l to show in full.
Edit vi /etc/ntp.conf
vi /etc/ntp.conf
server 0.centos.pool.ntp.org iburst
server 1.centos.pool.ntp.org iburst
server 2.centos.pool.ntp.org iburst
server 3.centos.pool.ntp.org iburst
systemctl status ntpd
systemctl enable ntpd
systemctl restart ntpd
systemctl status ntpd
Oracle Installe GUI in a remote desktop
rpm -Uvh http://li.nux.ro/download/nux/dextop/el7/x86_64/nux-dextop-release-0-1.el7.nux.noarch.rpm
yum groupinstall “GNOME Desktop” “Graphical Administration Tools”
yum -y install xrdp tigervnc-server
systemctl start xrdp.service
Check if xRDP is running?
[root@rac1 ~]# systemctl start xrdp.service
[root@rac1 ~]# netstat -antup | grep xrdp
tcp 0 0 127.0.0.1:3350 0.0.0.0:* LISTEN 12815/xrdp-sesman
tcp 0 0 0.0.0.0:3389 0.0.0.0:* LISTEN 12816/xrdp
[root@rac1 ~]# systemctl enable xrdp.service
Created symlink from /etc/systemd/system/multi-user.target.wants/xrdp.service to /usr/lib/systemd/system/xrdp.service.
Reboot -n
Oracle requirement
curl -o oracle-database-preinstall-19c-1.0-1.el7.x86_64.rpm https://yum.oracle.com/repo/OracleLinux/OL7/latest/x86_64/getPackage/oracle-database-preinstall-19c-1.0-1.el7.x86_64.rpm
yum -y localinstall oracle-database-preinstall-19c-1.0-1.el7.x86_64.rpm
Oracle ASM support RPM (Oracle ASMLib)
wget https://download.oracle.com/otn_software/asmlib/oracleasmlib-2.0.12-1.el7.x86_64.rpm
wget https://yum.oracle.com/repo/OracleLinux/OL7/latest/x86_64/getPackage/oracleasm-support-2.1.11-2.el7.x86_64.rpm
yum -y localinstall oracleasmlib-2.0.12-1.el7.x86_64.rpm
yum -y localinstall oracleasm-support-2.1.11-2.el7.x86_64.rpm
reboot
Create and configure oracle and oracle user
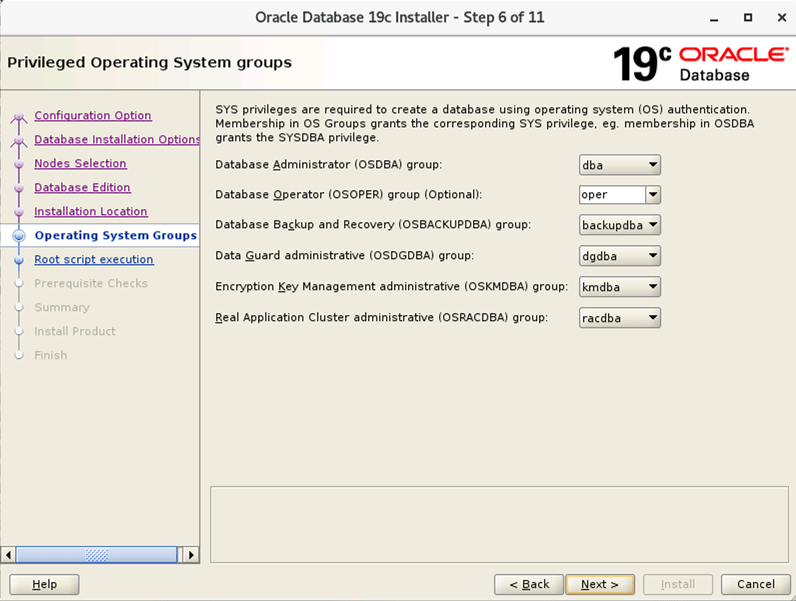
Create additional OS groups
groupadd -g 54333 asmdba
groupadd -g 54334 asmoper
groupadd -g 54335 asmadmin
passwd oracle
[root@rac1 ~]# id oracle
uid=54321(oracle) gid=54321(oinstall) groups=54321(oinstall),54322(dba),54323(oper),54324(backupdba),54325(dgdba),54326(kmdba),54330(racdba),54333(asmdba),54334(asmoper),54335(asmadmin)
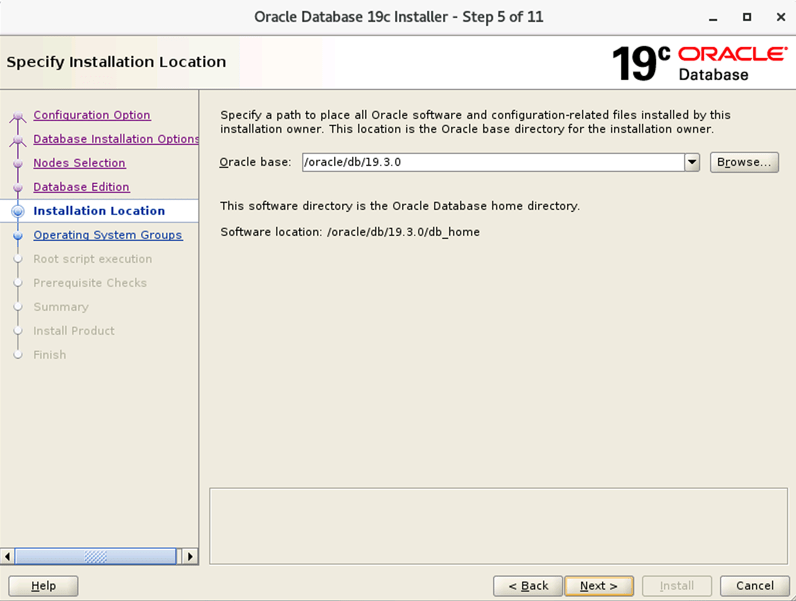
Create directories
mkdir -p /oracle/grid/19.3.0/grid_home
mkdir -p /oracle/grid/gridbase/
mkdir -p /oracle/db/19.3.0/db_home
chown -R oracle.oinstall /oracle/
chown -R oracle.oinstall /oracle/grid/
chmod -R 775 /oracle/
Oracle Settings
You can add the db bash_profile use vi
export TMP=/tmp
export TMPDIR=$TMP
export ORACLE_HOSTNAME=rac1
export ORACLE_UNQNAME=orcl
export ORACLE_BASE=/oracle/db/19.3.0
export DB_HOME=$ORACLE_BASE/db_home
export ORACLE_HOME=$DB_HOME
export ORACLE_SID=orcl
export ORACLE_TERM=xterm
export PATH=/usr/sbin:/usr/local/bin:$PATH
export PATH=$ORACLE_HOME/bin:$PATH
export LD_LIBRARY_PATH=$ORACLE_HOME/lib:/lib:/usr/lib
export CLASSPATH=$ORACLE_HOME/jlib:$ORACLE_HOME/rdbms/jlib
You can add the grid bash_profile use vi
export TMP=/tmp
export TMPDIR=$TMP
export ORACLE_HOSTNAME=rac1
export ORACLE_BASE=/oracle/grid/gridbase
export ORACLE_HOME=/oracle/grid/19.3.0/grid_home
export GRID_BASE=/oracle/grid/gridbase
export GRID_HOME=/oracle/grid/19.3.0/grid_home
export ORACLE_SID=+ASM1
export ORACLE_TERM=xterm
export PATH=/usr/sbin:/usr/local/bin:$PATH
export PATH=$ORACLE_HOME/bin:$PATH
export LD_LIBRARY_PATH=$ORACLE_HOME/lib:/lib:/usr/lib
export CLASSPATH=$ORACLE_HOME/jlib:$ORACLE_HOME/rdbms/jlib
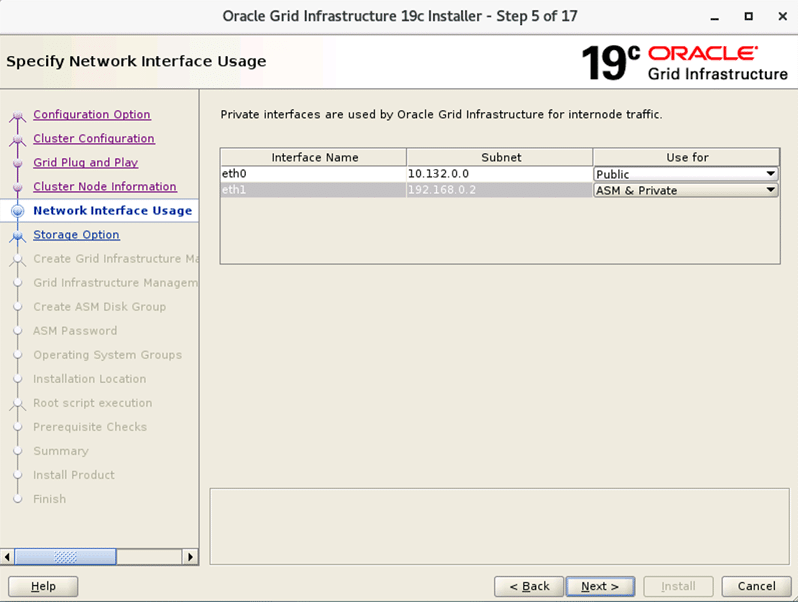
Manuel add and test vip,rac,scan and private ip
ip addr add 10.132.0.6/32 broadcast 10.132.0.2 dev eth0 label eth0:1
Delete
ip addr del 10.132.0.6/32 broadcast 10.132.0.2 dev eth0 label eth0:1
[root@rac1 ~]# ip addr add 10.132.0.5/32 broadcast 10.132.0.255 dev eth0 label eth0:2
[root@rac1 ~]# ip addr
1: lo: mtu 65536 qdisc noqueue state UNKNOWN group default qlen 1000
link/loopback 00:00:00:00:00:00 brd 00:00:00:00:00:00
inet 127.0.0.1/8 scope host lo
valid_lft forever preferred_lft forever
inet6 ::1/128 scope host
valid_lft forever preferred_lft forever
2: eth0: mtu 1460 qdisc pfifo_fast state UP group default qlen 1000
link/ether 42:01:0a:84:00:02 brd ff:ff:ff:ff:ff:ff
inet 10.132.0.2/32 brd 10.132.0.2 scope global noprefixroute dynamic eth0
valid_lft 3454sec preferred_lft 3454sec
inet6 fe80::85d9:e9a5:54d4:b88b/64 scope link noprefixroute
valid_lft forever preferred_lft forever
3: eth1: mtu 1460 qdisc pfifo_fast state UP group default qlen 1000
link/ether 42:01:c0:a8:00:03 brd ff:ff:ff:ff:ff:ff
inet 192.168.0.3/32 brd 192.168.0.3 scope global dynamic eth1
valid_lft 2020sec preferred_lft 2020sec
inet6 fe80::4001:c0ff:fea8:3/64 scope link
valid_lft forever preferred_lft forever
EDİT DNS NETWORK
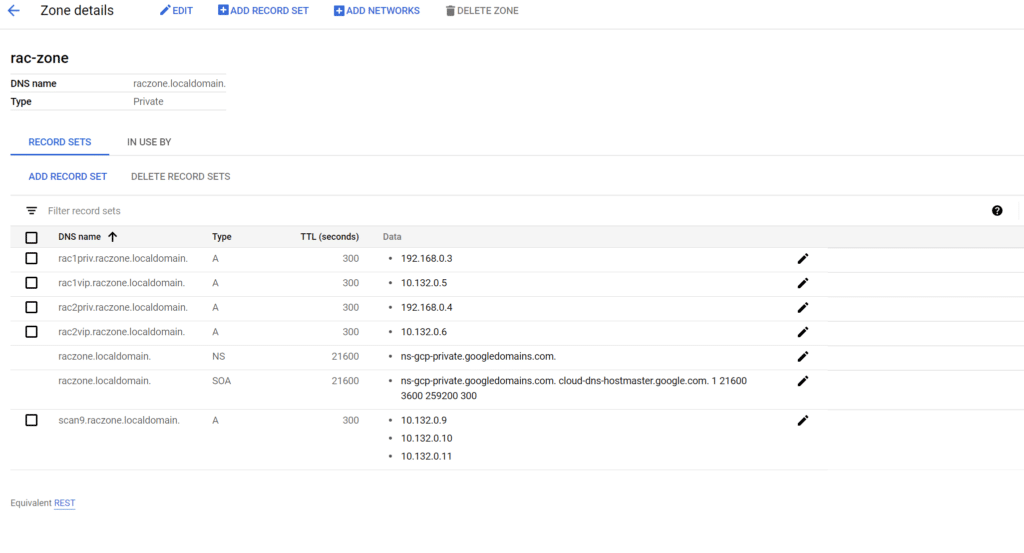
EDİT DNS CONF
vi /etc/resolv.conf
NSLOOKUP
[root@rac1 ~]# nslookup rac1vip.raczone.localdomain
Server: 169.254.169.254
Address: 169.254.169.254#53Non-authoritative answer:
Name: rac1vip.raczone.localdomain
Address: 10.132.0.5[root@rac1 ~]# nslookup rac2vip.raczone.localdomain
Server: 169.254.169.254
Address: 169.254.169.254#53Non-authoritative answer:
Name: rac2vip.raczone.localdomain
Address: 10.132.0.6[root@rac1 ~]# nslookup scan9.raczone.localdomain.
Server: 169.254.169.254
Address: 169.254.169.254#53Non-authoritative answer:
Name: scan9.raczone.localdomain
Address: 10.132.0.11
Name: scan9.raczone.localdomain
Address: 10.132.0.10
Name: scan9.raczone.localdomain
Address: 10.132.0.9[root@rac1 ~]# nslookup rac1priv.raczone.localdomain.
Server: 169.254.169.254
Address: 169.254.169.254#53Non-authoritative answer:
Name: rac1priv.raczone.localdomain
Address: 192.168.0.3[root@rac1 ~]# nslookup rac2priv.raczone.localdomain
Server: 169.254.169.254
Address: 169.254.169.254#53Non-authoritative answer:
Name: rac2priv.raczone.localdomain
Address: 192.168.0.4
[root@rac1 ~]# nslookup (test scan,vip,public,private ip).
Edit your / etc / hosts file and add the following lines, making sure to replace our public IPS on our 10.132.0.0/32 subnet with your values. Best practices and the installation of production Oracle require 3 SCAN IPs to be defined, but for our experiment, one ip will be enough to start Clusterware services.
127.0.0.1 localhost localhost.localdomain localhost4 localhost4.localdomain4
::1 localhost localhost.localdomain localhost6 localhost6.localdomain610.132.0.2 rac1.localdomain rac1
10.132.0.3 rac2.localdomain rac210.132.0.5 rac1vip.raczone.localdomain. rac1-vip
10.132.0.6 rac2vip.raczone.localdomain. rac2-vip10.132.0.9 scan9.raczone.localdomain. rac-scan
10.132.0.10 scan9.raczone.localdomain. rac-scan
10.132.0.11 scan9.raczone.localdomain. rac-scan192.168.0.3 rac1priv.raczone.localdomain. rac1-priv
192.168.0.4 rac2priv.raczone.localdomain. rac2-priv192.168.0.3 rac1.europe-west1-b.c.fundamental-rig-102208.internal rac1 # Added by Google
169.254.169.254 metadata.google.internal # Added by Google
~systemctl restart NetworkManager.service
Reboot -n
systemctl disable firewalld
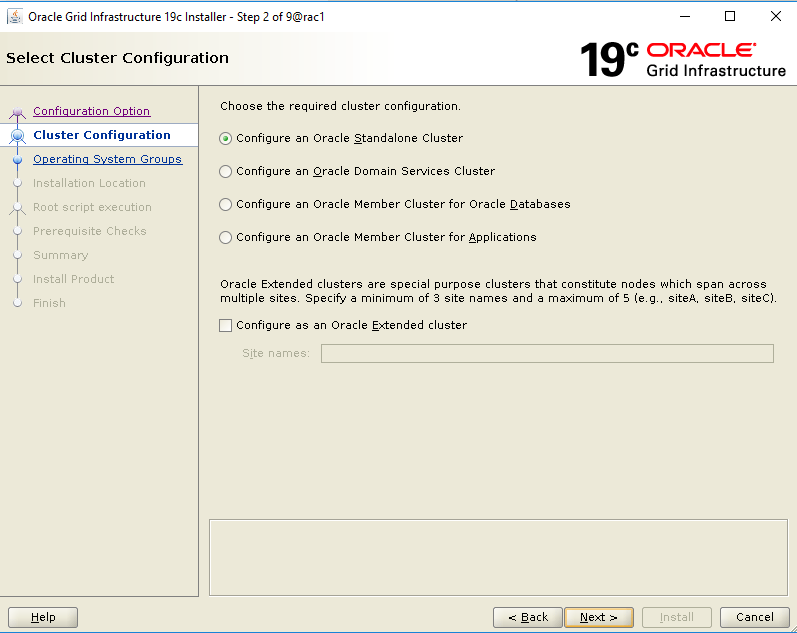
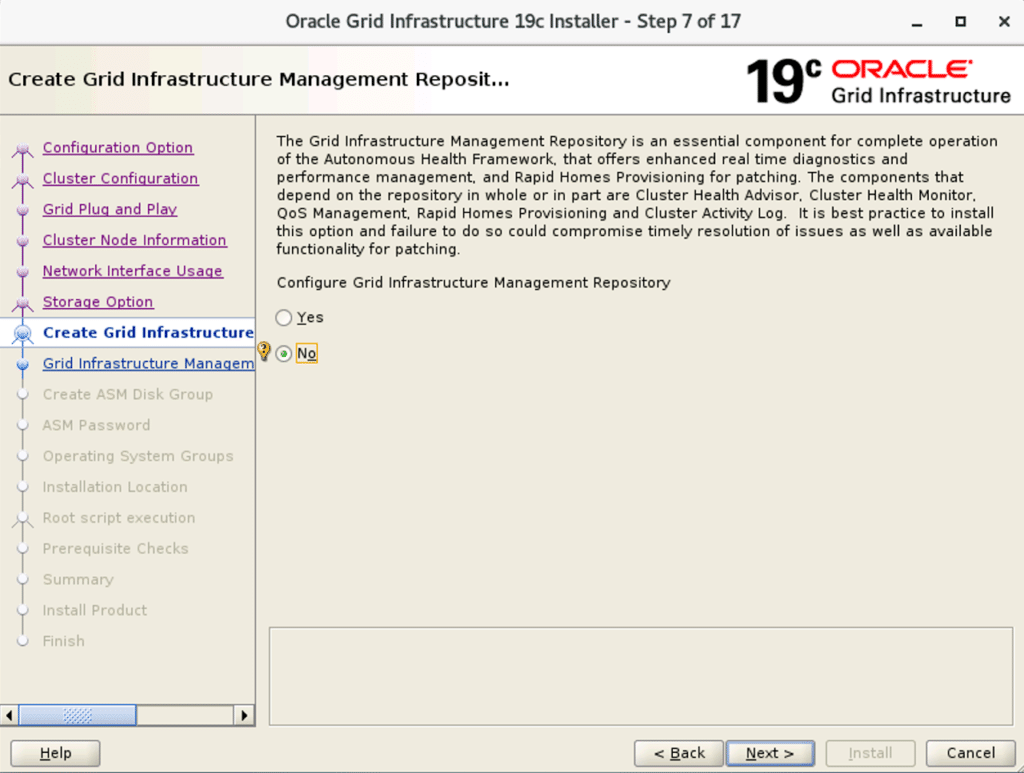
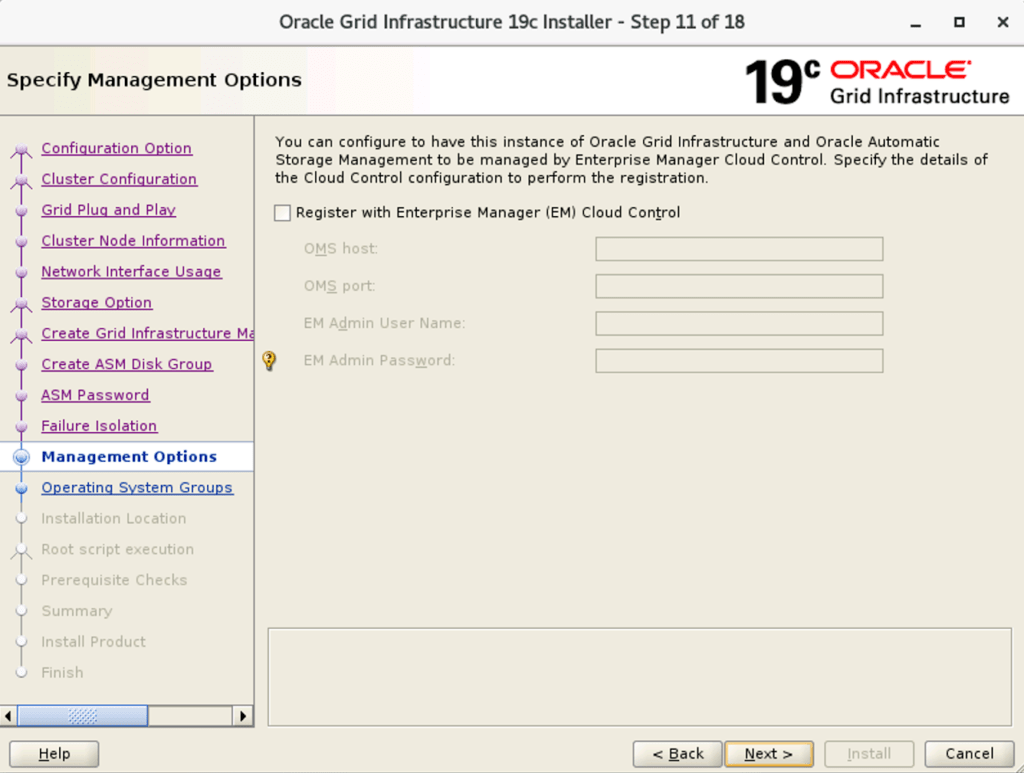
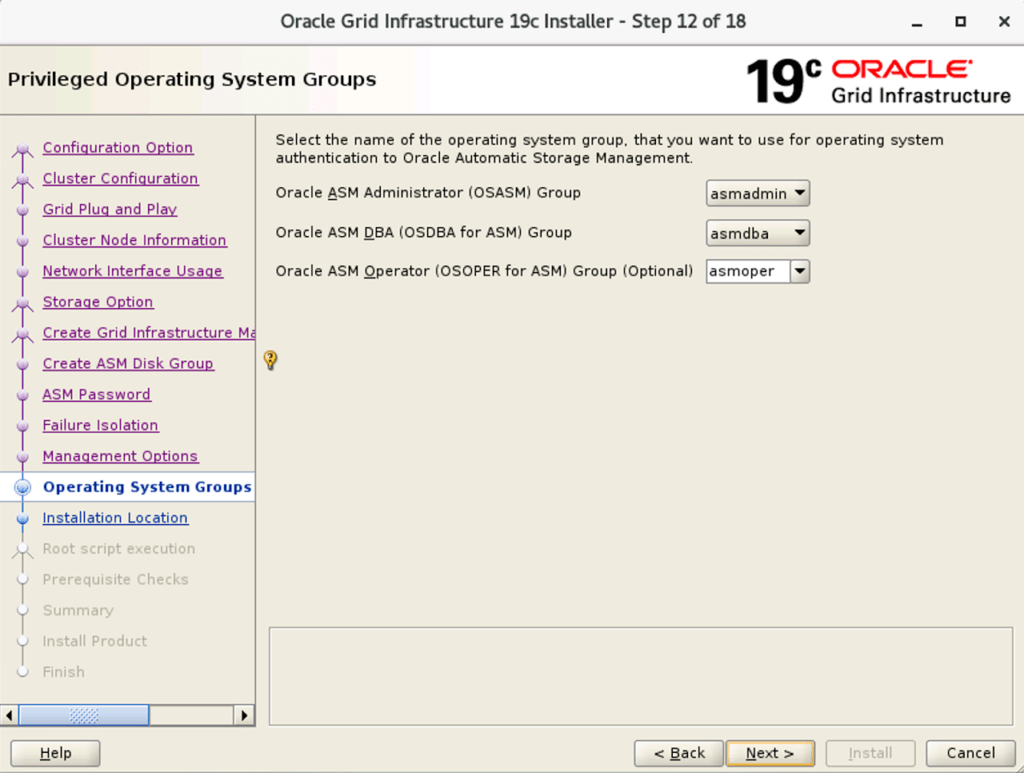
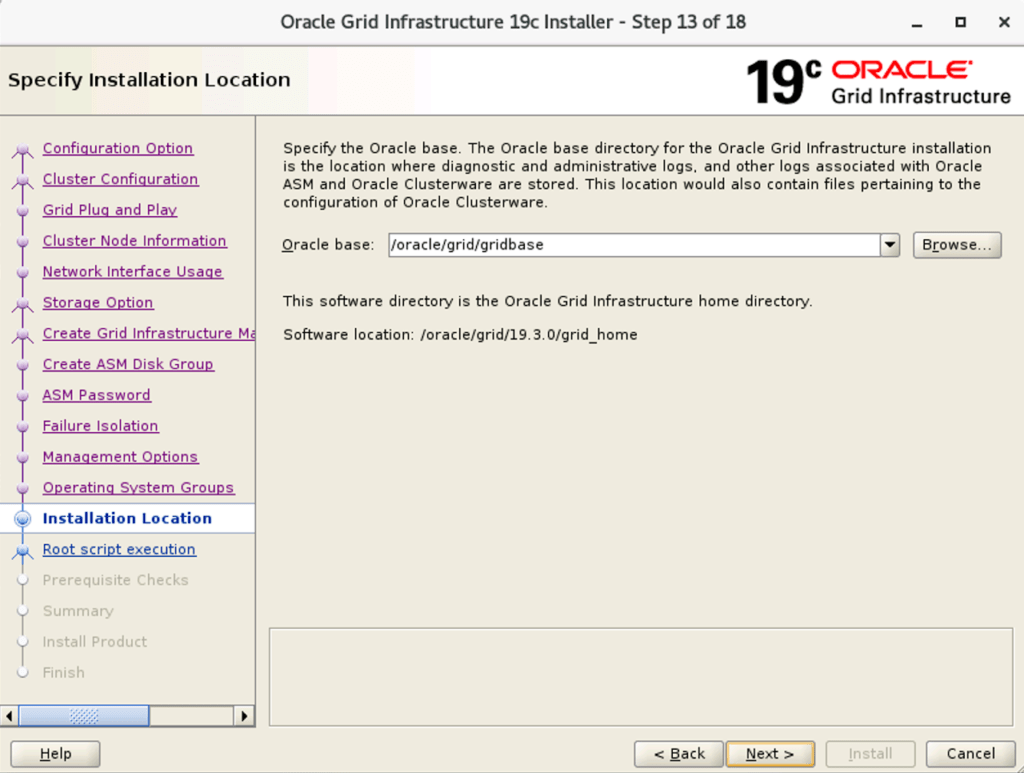
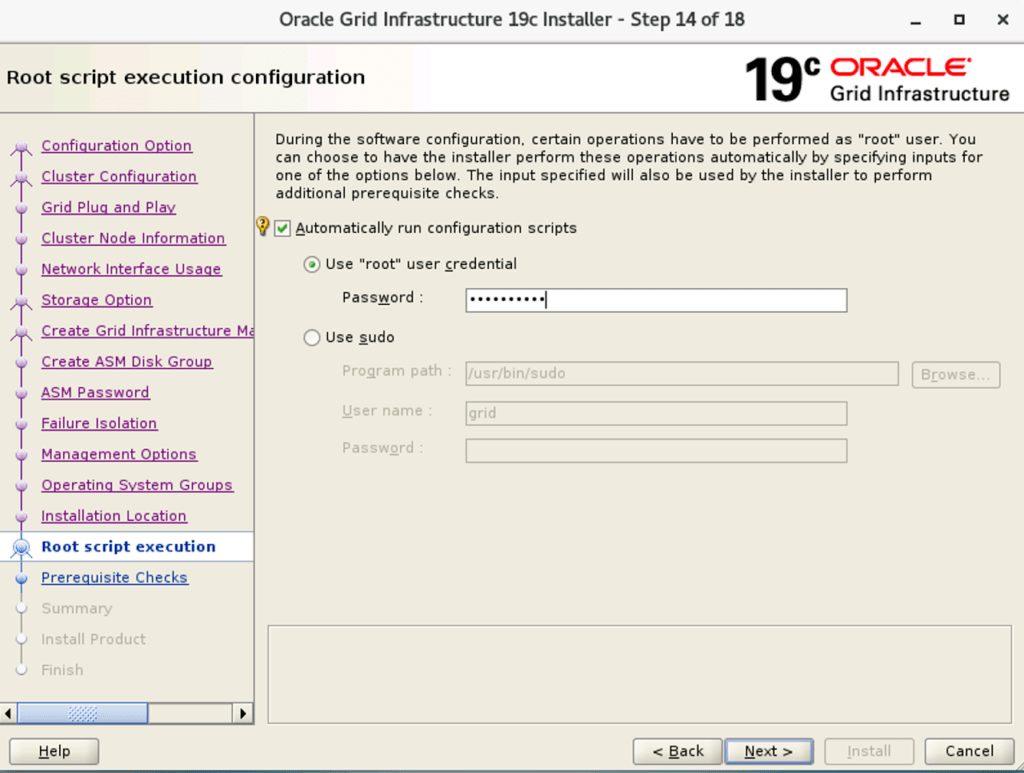
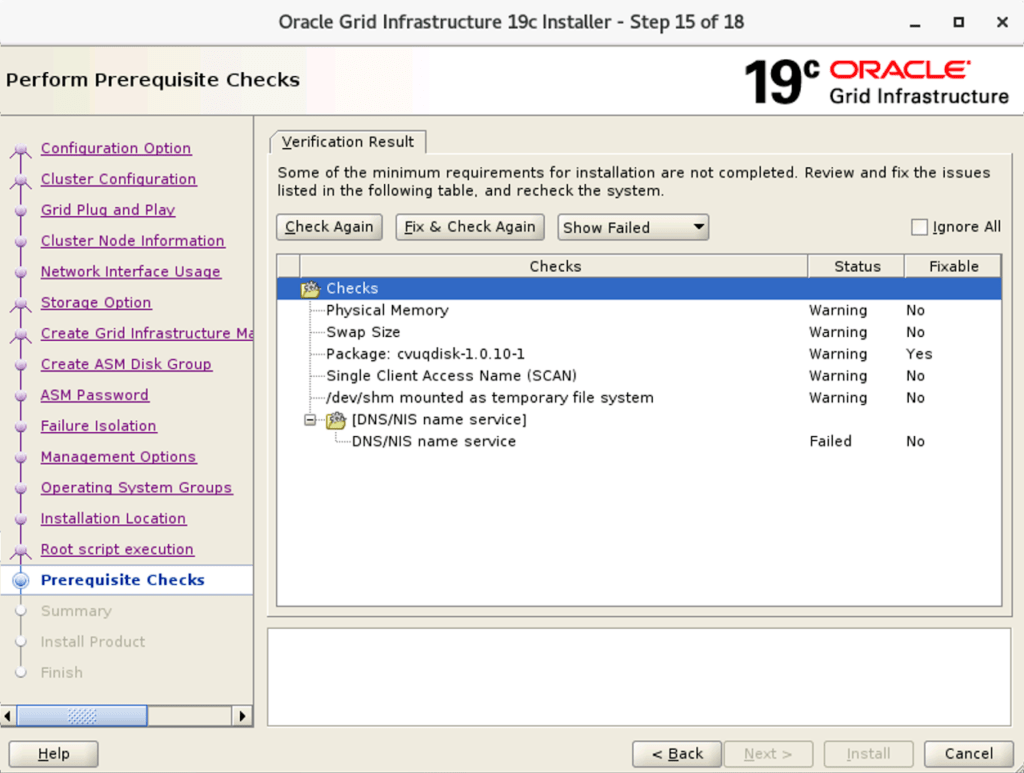
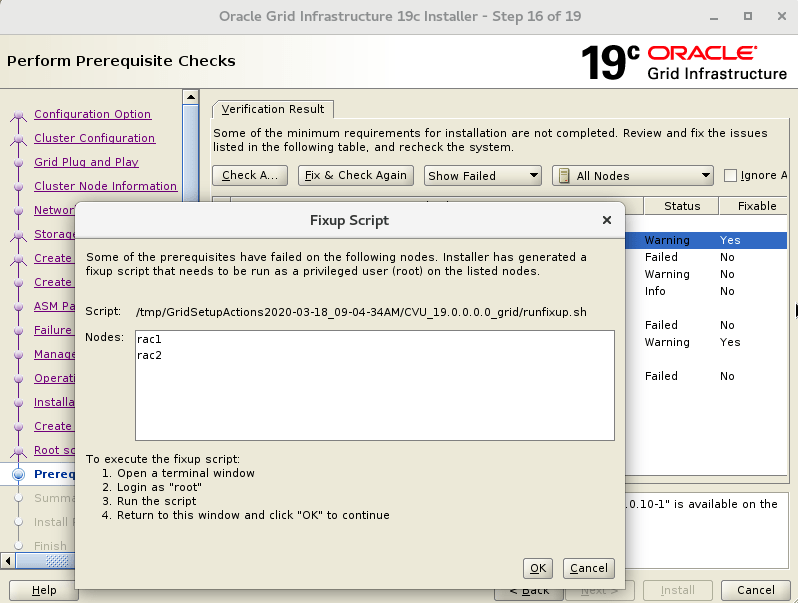
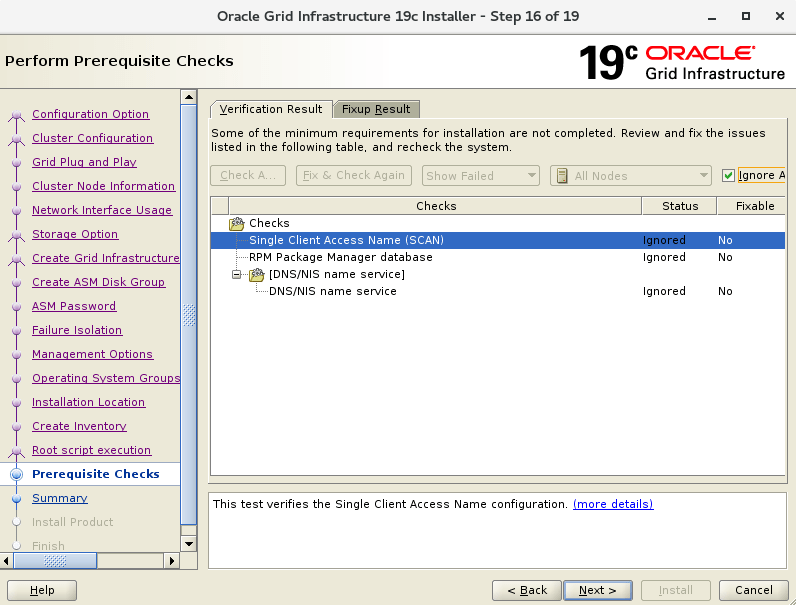
İnstall Oracle Grid İnfrastructure
Configuring the Oracle ASM library driver.
This will configure the on-boot properties of the Oracle ASM library
driver. The following questions will determine whether the driver is
loaded on boot and what permissions it will have. The current values
will be shown in brackets (‘[]’). Hitting without typing an
answer will keep that current value. Ctrl-C will abort.
Default user to own the driver interface []: oracle
Default group to own the driver interface []: asmadmin
Start Oracle ASM library driver on boot (y/n) [n]: y
Scan for Oracle ASM disks on boot (y/n) [y]:
Writing Oracle ASM library driver configuration: done
oracleasm init
Create new partitions
fdisk /dev/sdb
fdisk /dev/sdc
fdisk /dev/sdd
[root@rac1 network-scripts]# lsblk
NAME MAJ:MIN RM SIZE RO TYPE MOUNTPOINT
sda 8:0 0 50G 0 disk
├─sda1 8:1 0 200M 0 part /boot/efi
└─sda2 8:2 0 49.8G 0 part /
sdb 8:16 0 10G 0 disk
└─sdb1 8:17 0 10G 0 part
sdc 8:32 0 40G 0 disk
└─sdc1 8:33 0 40G 0 part
sdd 8:48 0 20G 0 disk
└─sdd1 8:49 0 20G 0 part
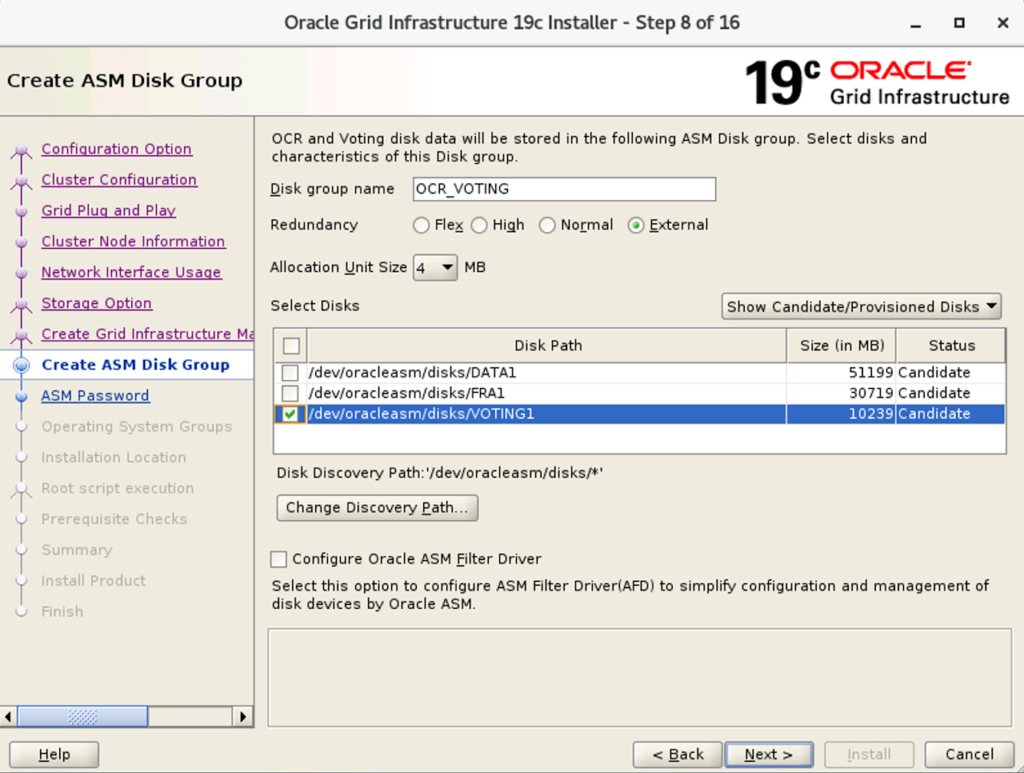
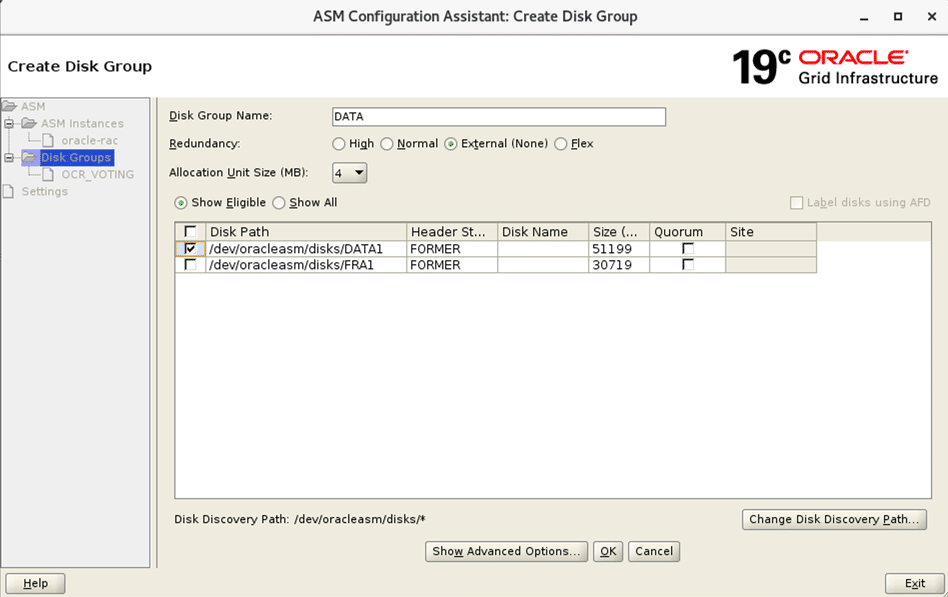
oracleasm createdisk -v DATA1 /dev/sdc1
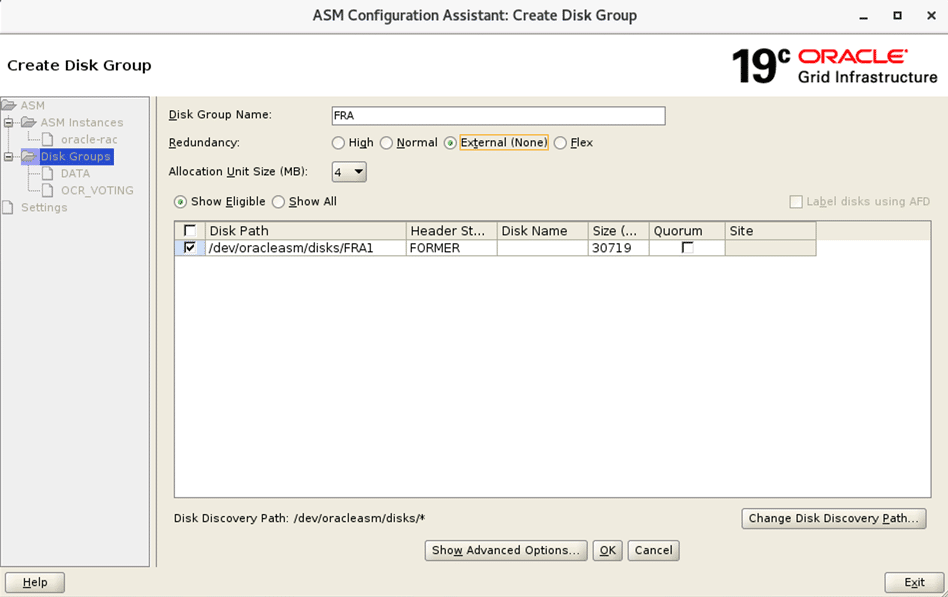
oracleasm createdisk -v RECO1 /dev/sdd1
oracleasm createdisk -v VOTING1 /dev/sdb1
[root@rac1 network-scripts]# oracleasm listdisks
DATA1
RECO1
VOTING1
partprobe
/grid/rpm go to grid directory
Run rpm -ivh cvuqdisk-1.0.10-1.rpm then scp this file to 2nd node bowl
scp cvuqdisk-1.0.9-1.rpm root @ rac2: / tmp /
rpm -ivh cvuqdisk-1.0.10-1.rpm do this on node 2
Oracle Grid Infrastructure and Oracle Database software download.
[root@rac1 ~]# wget –[email protected] –ask-password “https://download.oracle.com/otn/linux/oracle19c/190000/LINUX.X64_193000_grid_home.zip” -O LINUX.X64_193000_grid_home.zip
Password:
–2021-01-01 15:27:08– https://download.oracle.com/otn/linux/oracle19c/190000/LINUX.X64_193000_grid_home.zip
100%[================================================================================================>] 3,944 –.-K/s in 0s
2021-01-01 15:27:11 (594 MB/s) – ‘LINUX.X64_193000_grid_home.zip’ saved [3944/3944]
[root@rac1 ~]# wget –[email protected] –ask-password “https://download.oracle.com/otn/linux/oracle19c/190000/LINUX.X64_193000_db_home.zip” -O LINUX.X64_193000_db_home.zip
Password:
–2021-01-01 15:30:37– https://download.oracle.com/otn/linux/oracle19c/190000/LINUX.X64_193000_db_home.zip
……
100%[================================================================================================>] 3,878 –.-K/s in 0s
2021-01-01 15:30:38 (444 MB/s) – ‘LINUX.X64_193000_db_home.zip’ saved [3878/3878]
Move grid İnstall file
[root@rac1 ~]# mv LINUX.X64_193000_grid_home.zip /oracle/grid/19.3.0/grid_home
[root@rac1 ~]# cd /oracle/grid/19.3.0/grid_home
[root@rac1 grid_home]# ll
total 4
-rw-r–r– 1 root root 3944 Jan 1 15:27 LINUX.X64_193000_grid_home.zip
[root@rac1 grid_home]#chown oracle:oinstall LINUX.X64_193000_grid_home.zip
$ cd deinstall
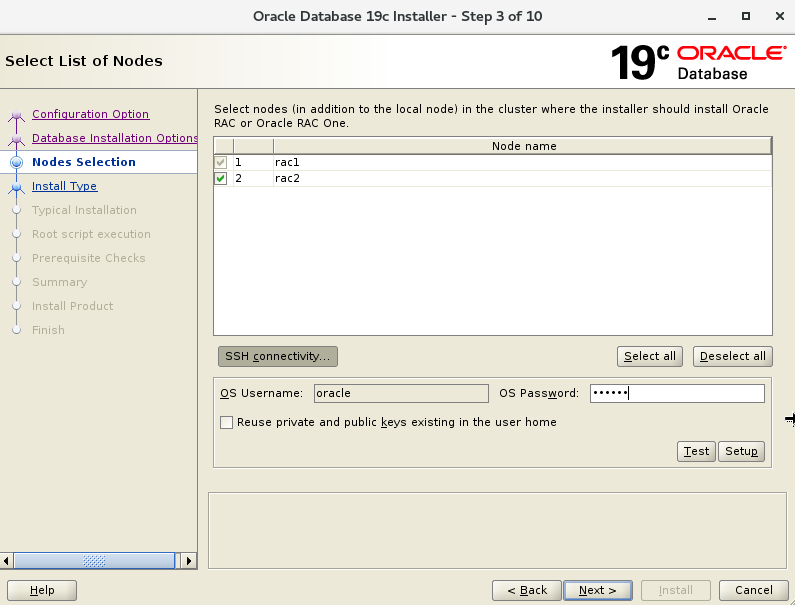
$ ./sshUserSetup.sh -user oracle -hosts “rac1 rac2” -noPromptPassphrase -confirm -advanced
cd ..
./runcluvfy.sh stage -pre crsinst -n rac1,rac2 -fixup -verbose
[root@rac1 grid_home]# cd /oracle/db/19.3.0/grid_home/cv/rpm
[root@rac1 rpm]# ls
cvuqdisk-1.0.10-1.rpm
[root@rac1 rpm]# rpm -ivh cvuqdisk-1.0.10-1.rpm
Preparing… ################################# [100%]
Using default group oinstall to install package
Updating / installing…
1:cvuqdisk-1.0.10-1 ################################# [100%]
Copy to rac2
scp cvuqdisk-1.0.10-1.rpm oracle@rac2:/tmp/
[root@rac2]# rpm -ivh cvuqdisk-1.0.10-1.rpm
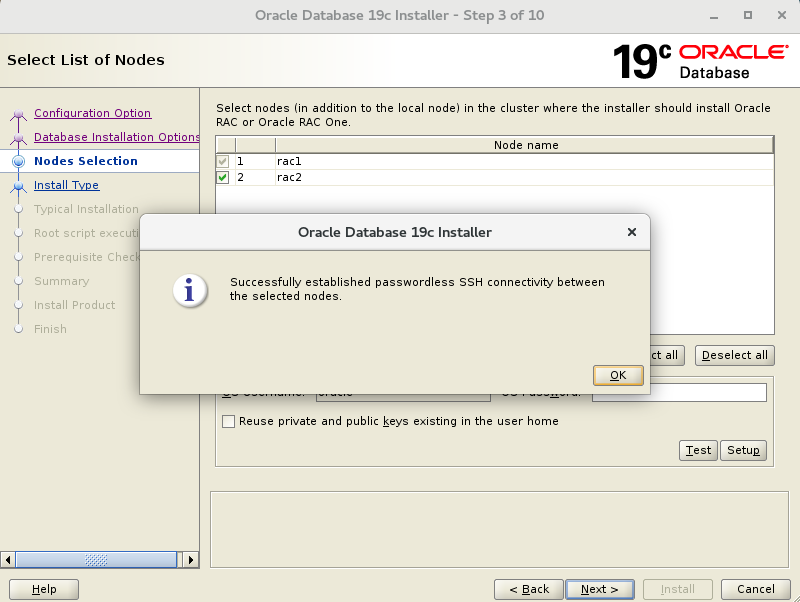
-Verification from complete-
SSH verification complete.
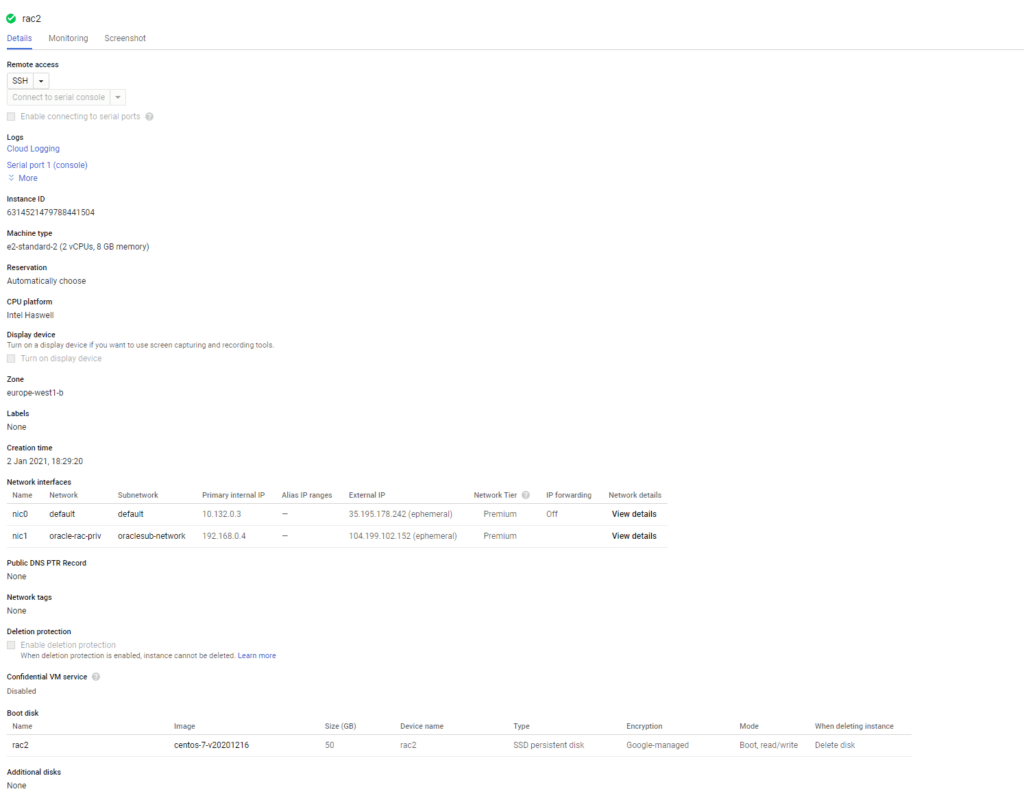
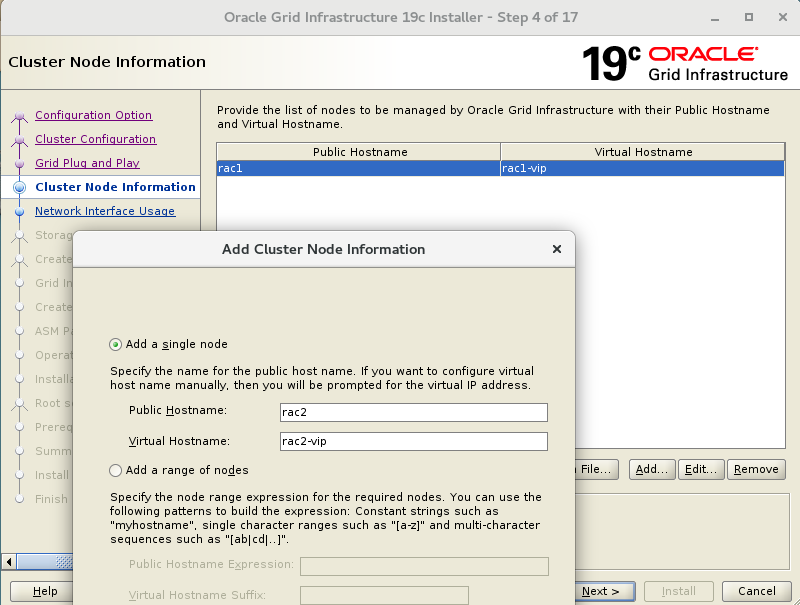
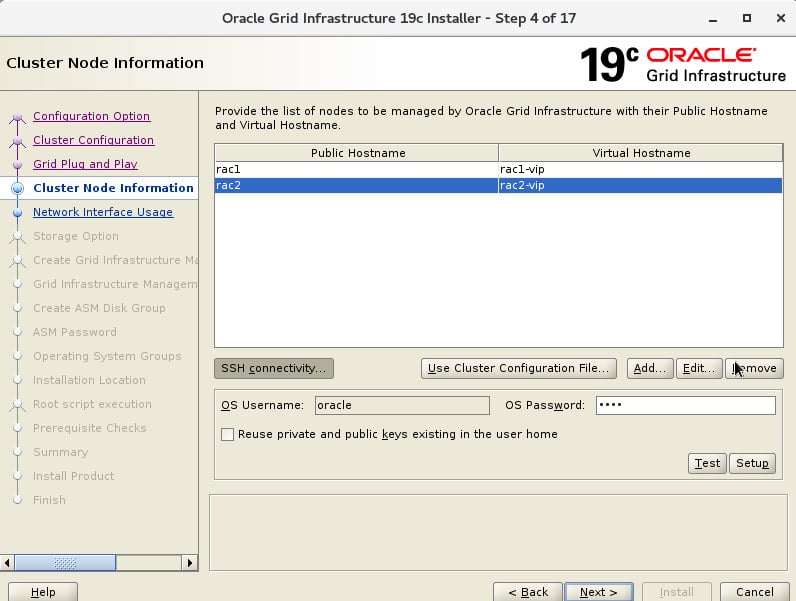
CREATE SLAVE NODE RAC2
You can create it by typing rac2 according to the primary explanation above.
Details are as follows;

sudo su –
yum update
In addition to the basic OS installation, the following packages must be installed whilst logged in as the root user.
This includes the 64-bit and 32-bit versions of some packages.
yum install gcc -y
yum install gcc-c++ -y
yum install glibc -y
yum install glibc.i686 -y
yum install glibc-devel -y
yum install glibc-devel.i686 -y
yum install ksh -y
yum install libgcc -y
yum install libgcc.i686 -y
yum install libstdc++ -y
yum install libstdc++.i686 -y
yum install libstdc++-devel -y
yum install libstdc++-devel.i686 -y
yum install libaio -y
yum install libaio.i686 -y
yum install libaio-devel -y
yum install libaio-devel.i686 -y
yum install libXext -y
yum install libXext.i686 -y
yum install libX11 -y
yum install libX11.i686 -y
yum install libXau -y
yum install libXau.i686 -y
yum install libxcb -y
yum install libxcb.i686 -y
yum install libXi -y
yum install libXi.i686 -y
yum install make -y
yum install sysstat -y
yum install unixODBC -y
yum install unixODBC-devel -y
yum install make-3.81-19.el6 -y
yum install nfs-utils -y
yum install sysstat-9.0.4 -y
Add or amend the following lines to the “/etc/sysctl.conf” file.
net.ipv4.ip_forward = 0
net.ipv4.conf.default.rp_filter = 1
net.ipv4.conf.default.accept_source_route = 0
kernel.sysrq = 0
kernel.core_uses_pid = 1
net.ipv4.tcp_syncookies = 1
kernel.msgmnb = 65536
kernel.msgmax = 65536
kernel.shmmax = 4398046511104
kernel.shmall = 1073741824
fs.file-max = 6815744
kernel.sem = 250 32000 100 128
kernel.shmmni = 4096
net.core.rmem_default = 262144
net.core.rmem_max = 4194304
net.core.wmem_default = 262144
net.core.wmem_max = 1048576
fs.aio-max-nr = 1048576
net.ipv4.ip_local_port_range = 9000 65500
kernel.panic_on_oops = 1
vm.swappiness = 1
vm.dirty_background_ratio = 3
vm.dirty_ratio = 80
vm.dirty_expire_centisecs = 500
vm.dirty_writeback_centisecs = 100
Run the following command to change the current kernel parameters.
/sbin/sysctl -p
Reboot
vi /etc/selinux/config and set SELINUX=disabled
[root@rac2 ~]# vi /etc/selinux/config
[root@rac2 ~]# systemctl stop firewalld.service
[root@rac2 ~]# systemctl disable firewalld.servicesystemctl stop firewalld
systemctl disable firewalldsystemctl stop avahi-daemon.service
systemctl disable avahi-daemon.service
— Make sure NTP (Chrony on OL7/RHEL7) is enabled.
systemctl stop chronyd
systemctl disable chronyd
[root@rac1 ~]# systemctl status firewalld
Removed symlink /etc/systemd/system/multi-user.target.wants/firewalld.service.
Removed symlink /etc/systemd/system/dbus-org.fedoraproject.FirewallD1.service.
[root@rac1 ~]# systemctl status firewalld
● firewalld.service – firewalld – dynamic firewall daemon
Loaded: loaded (/usr/lib/systemd/system/firewalld.service; disabled; vendor preset: enabled)
Active: inactive (dead)
Docs: man:firewalld(1)
Dec 28 23:04:49 localhost systemd[1]: Starting firewalld – dynamic firewall daemon…
Dec 28 23:04:49 localhost systemd[1]: Started firewalld – dynamic firewall daemon.
Dec 28 23:04:49 localhost firewalld[534]: WARNING: AllowZoneDrifting is enabled. This is considered an insecure configuration op…it now.
Dec 28 23:09:00 rac1 systemd[1]: Stopping firewalld – dynamic firewall daemon…
Dec 28 23:09:01 rac1 systemd[1]: Stopped firewalld – dynamic firewall daemon.
Hint: Some lines were ellipsized, use -l to show in full.
Or No Stop Chronoy
vi /etc/chrony.conf
Allow NTP client access from local network.
allow 192.168.0.0/16
allow 10.142.0.0/16
[root@rac2 ~]# systemctl restart chronyd.service
[root@rac2 ~]# systemctl enable chronyd.service
[root@rac2 ~]# systemctl status chronyd
● chronyd.service – NTP client/server
Loaded: loaded (/usr/lib/systemd/system/chronyd.service; enabled; vendor preset: enabled)
Active: active (running) since Mon 2020-12-28 23:13:19 UTC; 7s ago
Docs: man:chronyd(8)
man:chrony.conf(5)
Main PID: 11830 (chronyd)
CGroup: /system.slice/chronyd.service
└─11830 /usr/sbin/chronyd
Dec 28 23:13:19 rac1 systemd[1]: Starting NTP client/server…
Dec 28 23:13:19 rac1 chronyd[11830]: chronyd version 3.4 starting (+CMDMON +NTP +REFCLOCK +RTC +PRIVDROP +SCFILTER +SIGND +ASYN… +DEBUG)
Dec 28 23:13:19 rac1 chronyd[11830]: Frequency -59.041 +/- 0.728 ppm read from /var/lib/chrony/drift
Dec 28 23:13:19 rac1 systemd[1]: Started NTP client/server.
Dec 28 23:13:23 rac1 chronyd[11830]: Selected source 169.254.169.254
Hint: Some lines were ellipsized, use -l to show in full.
Edit vi /etc/ntp.conf
vi /etc/ntp.conf
server 0.centos.pool.ntp.org iburst
server 1.centos.pool.ntp.org iburst
server 2.centos.pool.ntp.org iburst
server 3.centos.pool.ntp.org iburst
systemctl status ntpd
systemctl enable ntpd
systemctl restart ntpd
systemctl status ntpd
Oracle Installe GUI in a remote desktop
rpm -Uvh http://li.nux.ro/download/nux/dextop/el7/x86_64/nux-dextop-release-0-1.el7.nux.noarch.rpm
yum groupinstall “GNOME Desktop” “Graphical Administration Tools”
yum -y install xrdp tigervnc-server
systemctl start xrdp.service
Check if xRDP is running?
[root@rac2 ~]# systemctl start xrdp.service
[root@rac2 ~]# netstat -antup | grep xrdp
tcp 0 0 127.0.0.1:3350 0.0.0.0:* LISTEN 12815/xrdp-sesman
tcp 0 0 0.0.0.0:3389 0.0.0.0:* LISTEN 12816/xrdp
[root@rac1 ~]# systemctl enable xrdp.service
Created symlink from /etc/systemd/system/multi-user.target.wants/xrdp.service to /usr/lib/systemd/system/xrdp.service.
Reboot -n
Oracle requirement
curl -o oracle-database-preinstall-19c-1.0-1.el7.x86_64.rpm https://yum.oracle.com/repo/OracleLinux/OL7/latest/x86_64/getPackage/oracle-database-preinstall-19c-1.0-1.el7.x86_64.rpm
yum -y localinstall oracle-database-preinstall-19c-1.0-1.el7.x86_64.rpm
Oracle ASM support RPM (Oracle ASMLib)
wget https://download.oracle.com/otn_software/asmlib/oracleasmlib-2.0.12-1.el7.x86_64.rpm
wget https://yum.oracle.com/repo/OracleLinux/OL7/latest/x86_64/getPackage/oracleasm-support-2.1.11-2.el7.x86_64.rpm
yum -y localinstall oracleasmlib-2.0.12-1.el7.x86_64.rpm
yum -y localinstall oracleasm-support-2.1.11-2.el7.x86_64.rpm
reboot
Create and configure oracle and oracle user
Create additional OS groups
groupadd -g 54333 asmdba
groupadd -g 54334 asmoper
groupadd -g 54335 asmadmin
passwd oracle
[root@rac1 ~]# id oracle
uid=54321(oracle) gid=54321(oinstall) groups=54321(oinstall),54322(dba),54323(oper),54324(backupdba),54325(dgdba),54326(kmdba),54330(racdba),54333(asmdba),54334(asmoper),54335(asmadmin)
[root@rac2 ~]# oracleasm scandisks
Reloading disk partitions: done
Cleaning any stale ASM disks…
Scanning system for ASM disks…
Instantiating disk “DATA1”
Instantiating disk “FRA1”
Instantiating disk “VOTING1”
Create directories
mkdir -p /oracle/grid/19.3.0/grid_home
mkdir -p /oracle/grid/gridbase/
mkdir -p /oracle/db/19.3.0/db_home
chown -R oracle.oinstall /oracle/
chown -R oracle.oinstall /oracle/grid/
chmod -R 775 /oracle/
Oracle Settings
You can add the db bash_profile use vi
export TMP=/tmp
export TMPDIR=$TMP
export ORACLE_HOSTNAME=rac1
export ORACLE_UNQNAME=orcl
export ORACLE_BASE=/oracle/db/19.3.0
export DB_HOME=$ORACLE_BASE/db_home
export ORACLE_HOME=$DB_HOME
export ORACLE_SID=orcl
export ORACLE_TERM=xterm
export PATH=/usr/sbin:/usr/local/bin:$PATH
export PATH=$ORACLE_HOME/bin:$PATH
export LD_LIBRARY_PATH=$ORACLE_HOME/lib:/lib:/usr/lib
export CLASSPATH=$ORACLE_HOME/jlib:$ORACLE_HOME/rdbms/jlib
You can add the grid bash_profile use vi
export TMP=/tmp
export TMPDIR=$TMP
export ORACLE_HOSTNAME=rac1
export ORACLE_BASE=/oracle/grid/gridbase
export ORACLE_HOME=/oracle/grid/19.3.0/grid_home
export GRID_BASE=/oracle/grid/gridbase
export GRID_HOME=/oracle/grid/19.3.0/grid_home
export ORACLE_SID=+ASM1
export ORACLE_TERM=xterm
export PATH=/usr/sbin:/usr/local/bin:$PATH
export PATH=$ORACLE_HOME/bin:$PATH
export LD_LIBRARY_PATH=$ORACLE_HOME/lib:/lib:/usr/lib
export CLASSPATH=$ORACLE_HOME/jlib:$ORACLE_HOME/rdbms/jlib
[root@rac2 ~]# ip addr
1: lo: mtu 65536 qdisc noqueue state UNKNOWN group default qlen 1000
link/loopback 00:00:00:00:00:00 brd 00:00:00:00:00:00
inet 127.0.0.1/8 scope host lo
valid_lft forever preferred_lft forever
inet6 ::1/128 scope host
valid_lft forever preferred_lft forever
2: eth0: mtu 1460 qdisc pfifo_fast state UP group default qlen 1000
link/ether 42:01:0a:84:00:03 brd ff:ff:ff:ff:ff:ff
inet 10.132.0.3/32 brd 10.132.0.3 scope global noprefixroute dynamic eth0
valid_lft 3590sec preferred_lft 3590sec
inet6 fe80::4001:aff:fe84:3/64 scope link noprefixroute
valid_lft forever preferred_lft forever
3: eth1: mtu 1460 qdisc pfifo_fast state UP group default qlen 1000
link/ether 42:01:c0:a8:00:04 brd ff:ff:ff:ff:ff:ff
inet 192.168.0.4/32 brd 192.168.0.4 scope global dynamic eth1
valid_lft 2208sec preferred_lft 2208sec
inet6 fe80::4001:c0ff:fea8:4/64 scope link
valid_lft forever preferred_lft forever
Go to rac1
cd /root/Downloads/
mv LINUX.X64_193000_db_home.zip /oracle/db/19.3.0/db_home/cd /oracle/db/19.3.0/db_home
chown oracle:oinstall LINUX.X64_193000_db_home.zipsu – oracle
cd /oracle/grid/19.3.0/db_home/
unzip LINUX.X64_193000_db_home.zip
cd /oracle/grid/19.3.0/grid_home/
unzip LINUX.X64_193000_grid_home.zip
cd /$GRID_HOME/
./gridSetup.sh


rac1,rac2 root > orainstRoot.sh

Check status crs
/oracle/grid/19.3.0/grid_home/bin/crsctl stat res -t
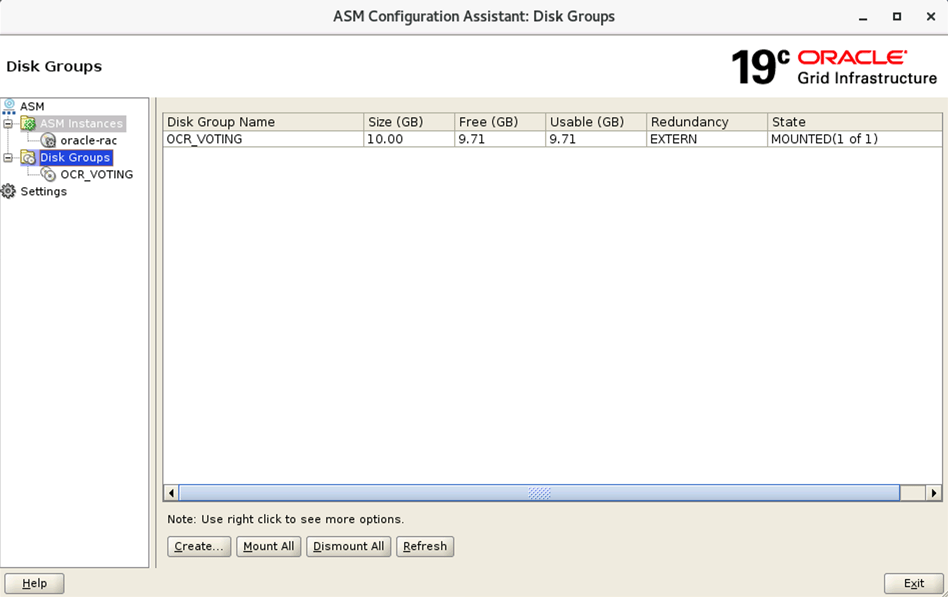
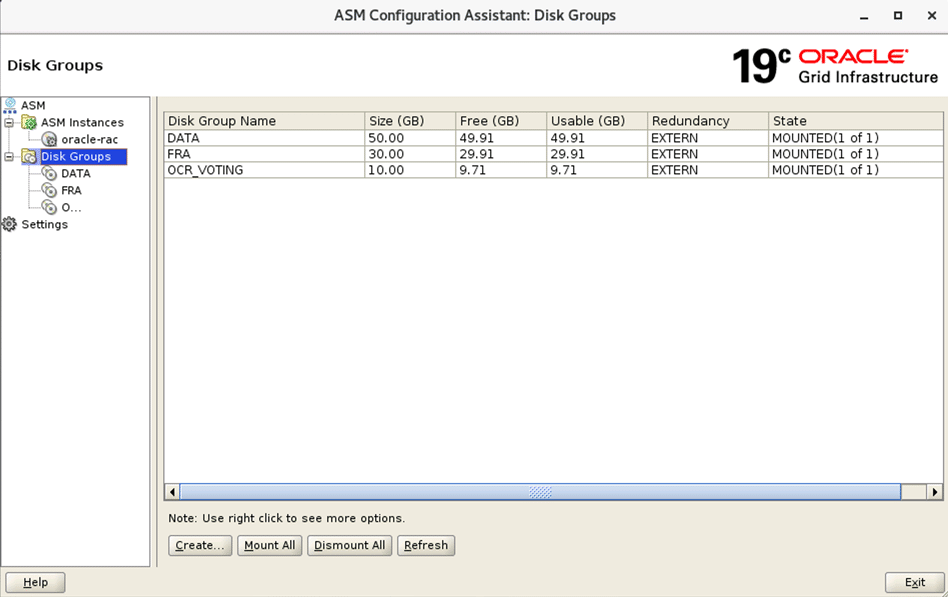
You can run the asmca
asmca
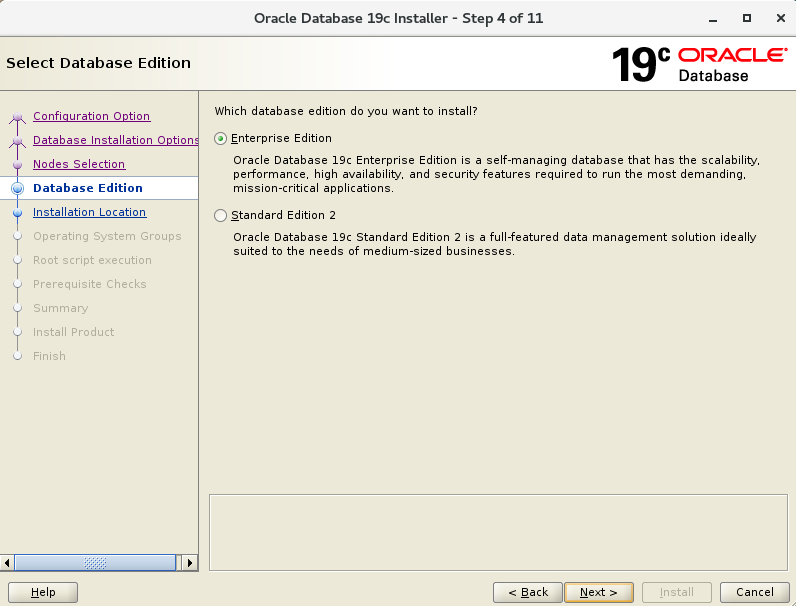
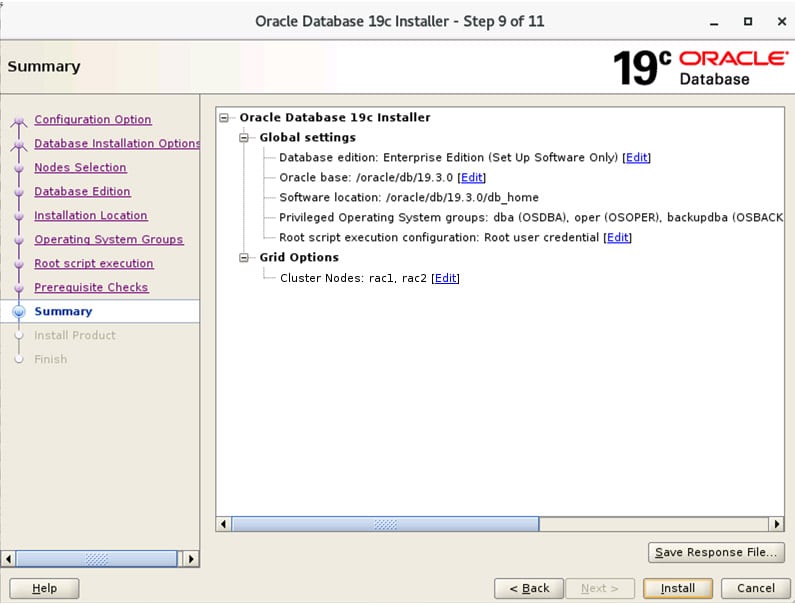
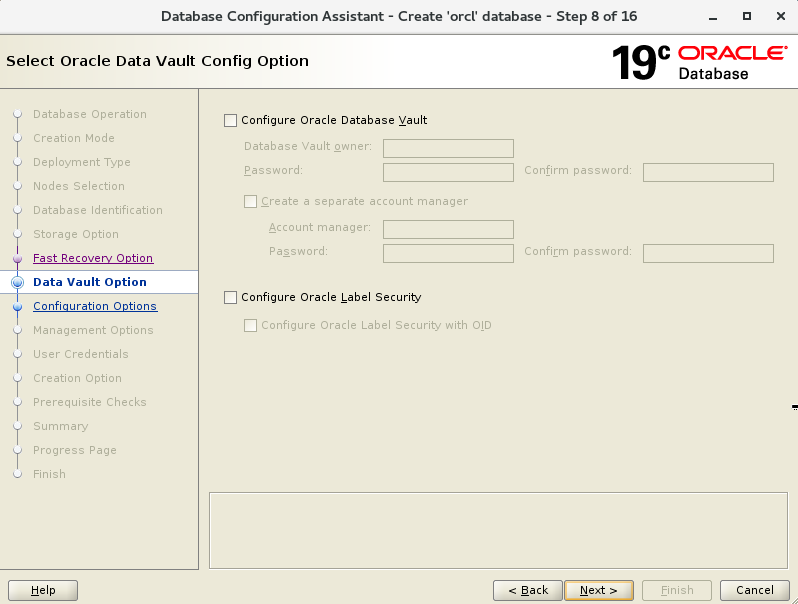
We can now Install Oracle Database 19c Sofware.
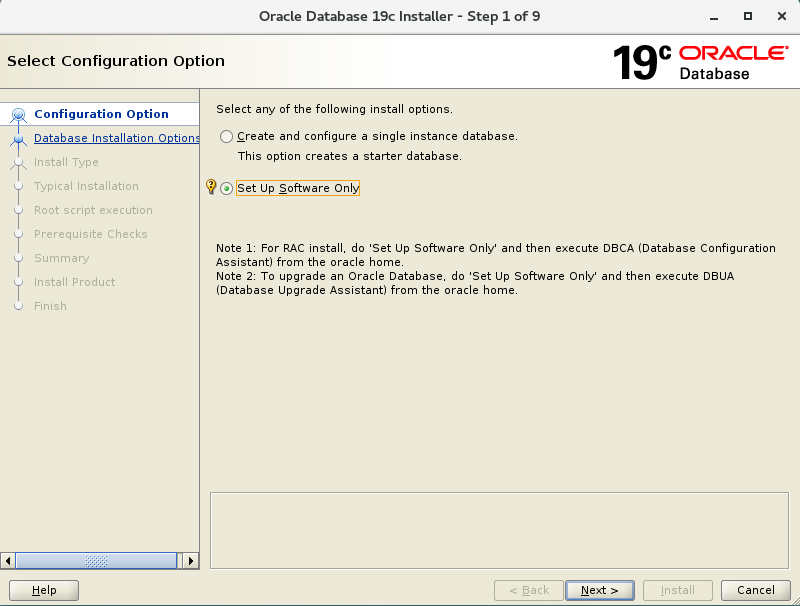


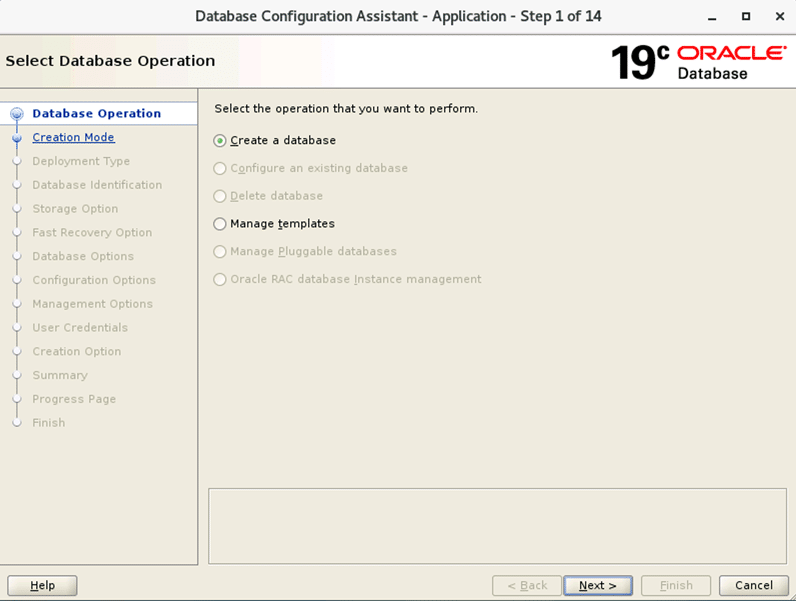
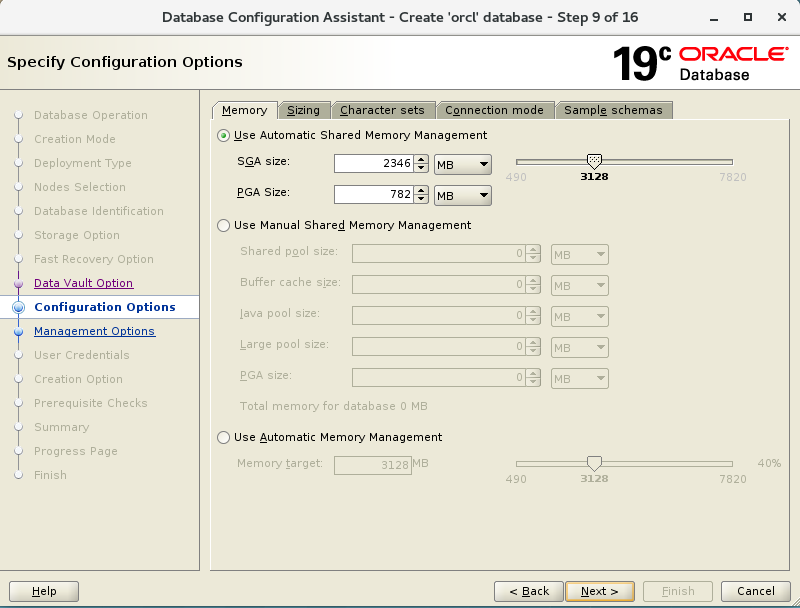
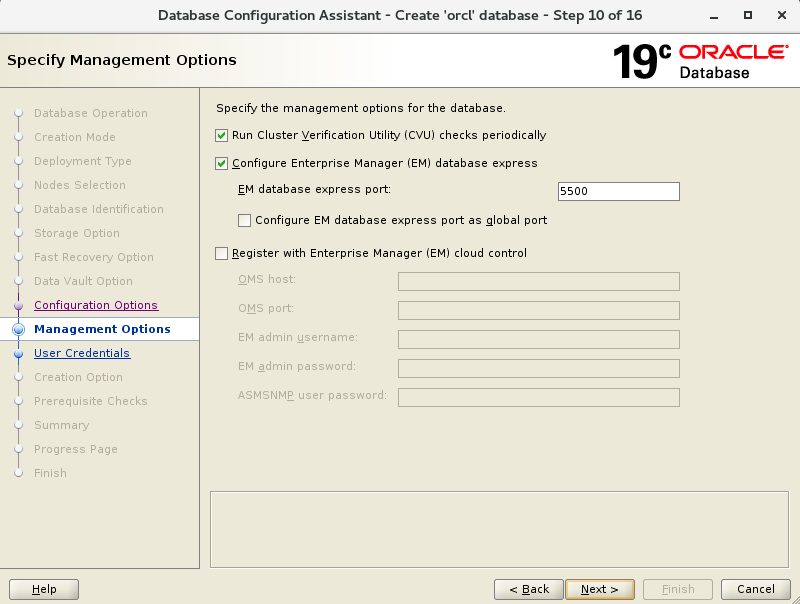
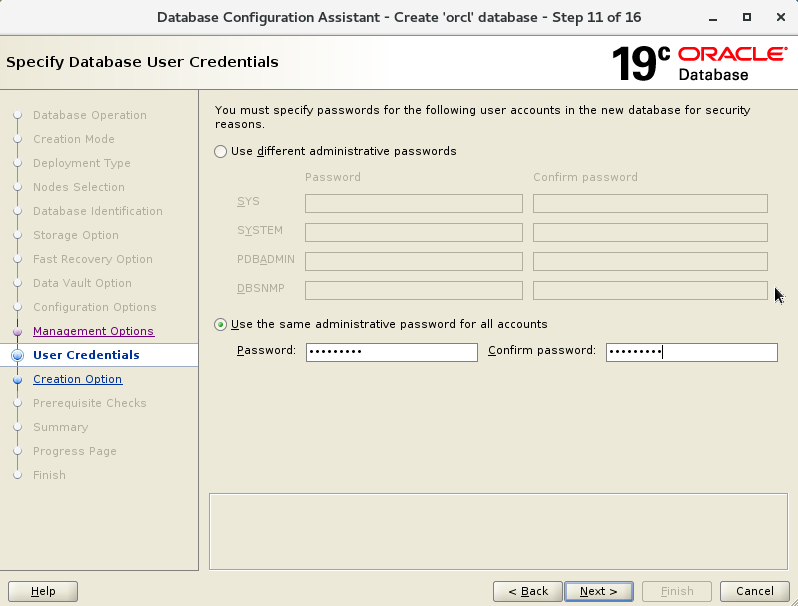
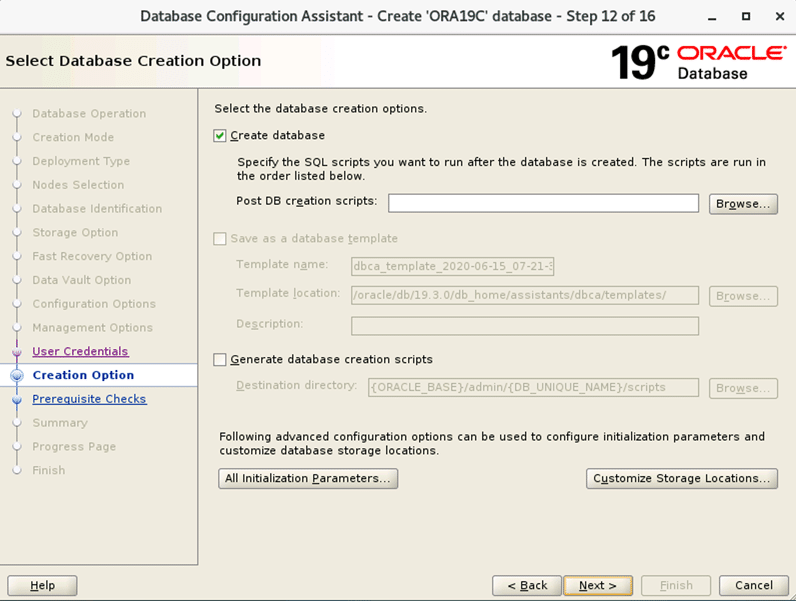
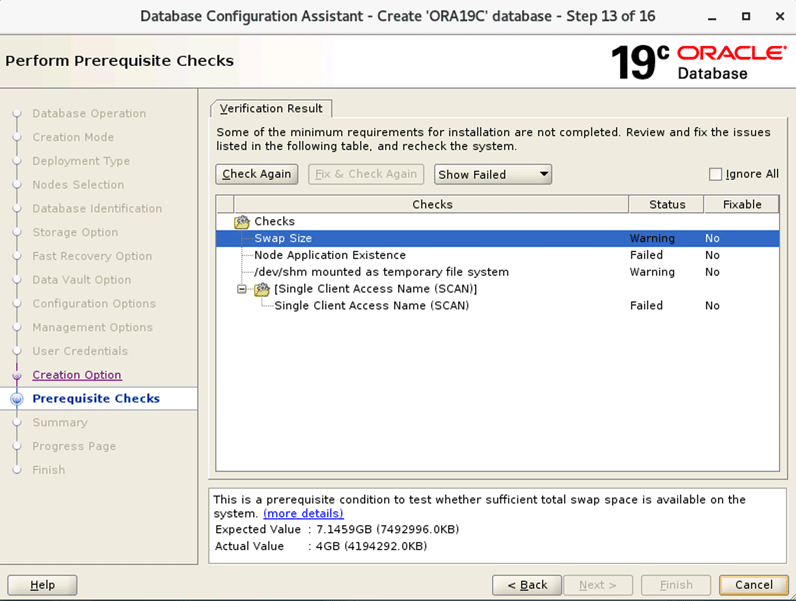
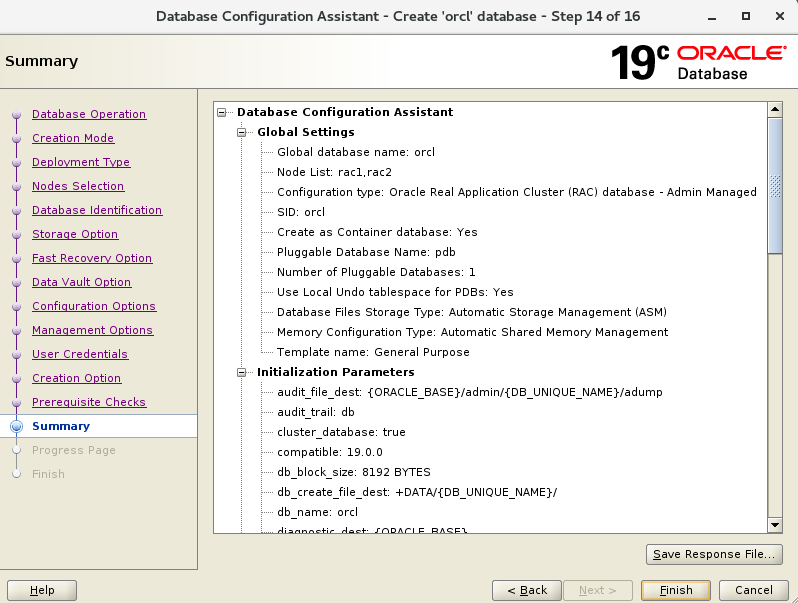
Congrats, You can run the DBCA
DBCA
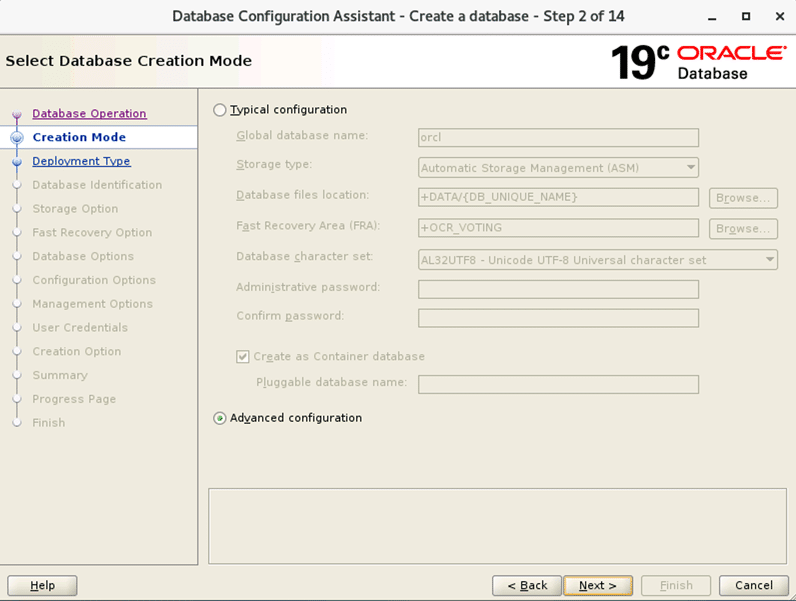


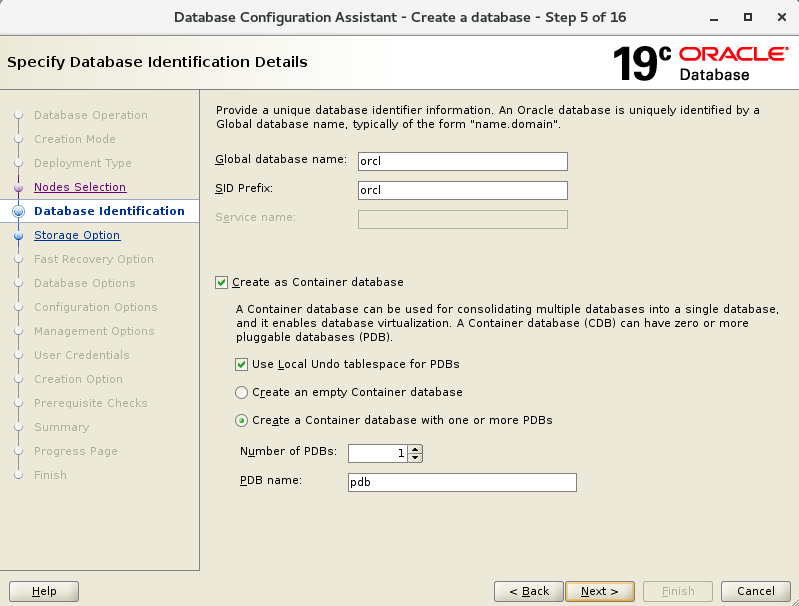
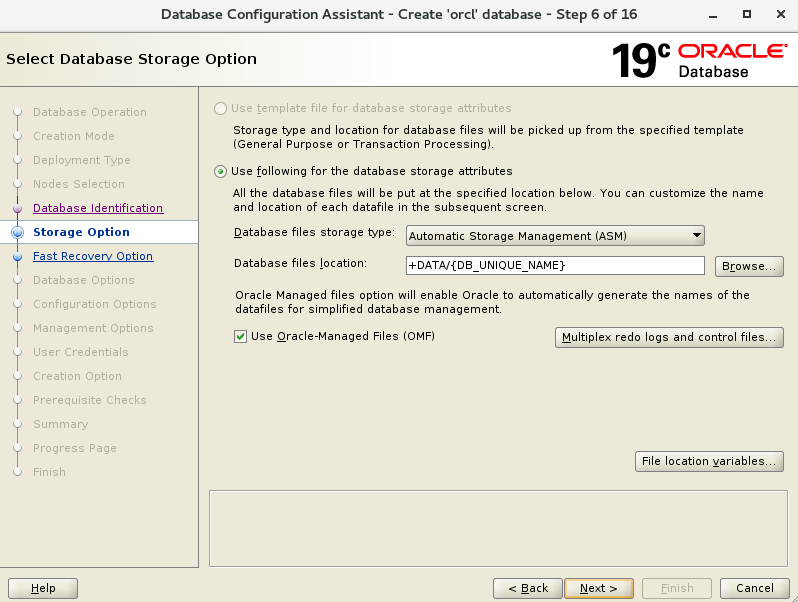
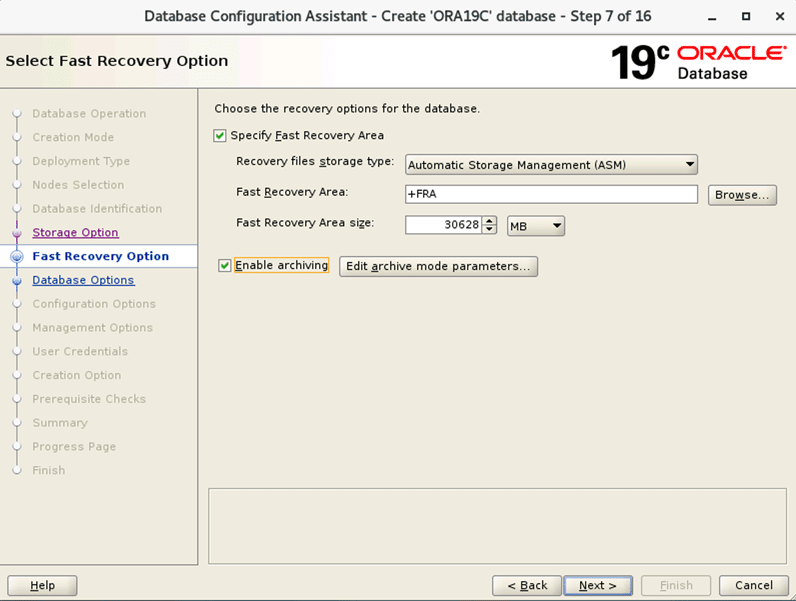

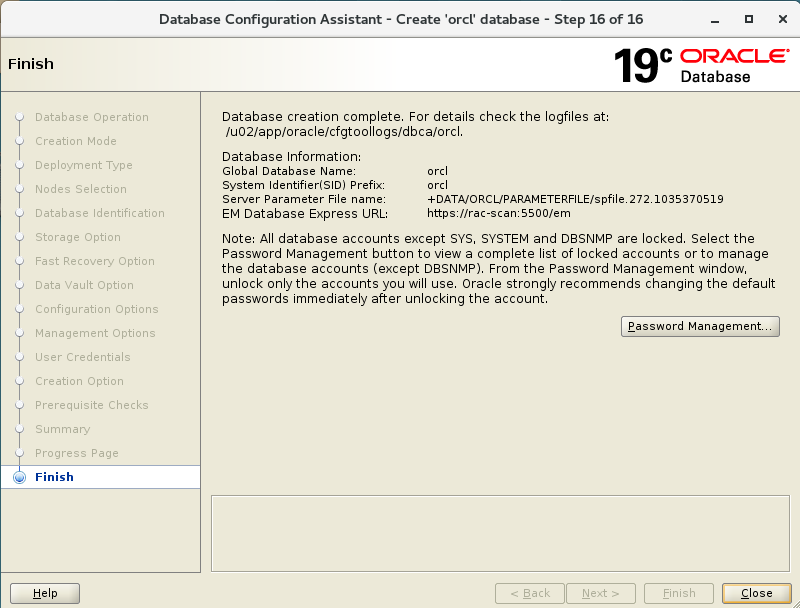
Congrats, Have a nice day.

Tags: